Xiaodong's Blog

Coder love Design


  • Home

  • Categories

  • Archives

Google Summer of Code 2019

Posted on 2019-08-20 | Edited on 2019-08-22 | In GSoC |

This post describes all stuffs about my GSoC 2019 project. Including information of my project, what I’ve done, what I’ve learned and how I feel during this program.

Project Information

  • Project Title: Edge Animations for Large-Scale Network Graphs
  • Student: Xiaodong Zhao
  • Organization: Computational Biology @ University of Nebraska-Lincoln
  • Mentors: Ales Saska, Resa Helikar
  • Project Code Repository: https://github.com/HelikarLab/ccNetViz

Project Overview

My main job is to add more features for ccNetViz library, a JavaScript library for visualization of large-scale network graphs using WebGL. It enables custom styling of nodes and edges in CSS like wavy, curve edges, dynamic changes of the network, force-directed layout and basic graph interactivity. Used for example by Cell Collective project.

As I wrote in my proposal, I’ll add edge animations on it. Including color animations, speed control and other fancy animations like wavy curve, dotted line and bubble flow effects. These animations will be totally customizable and we’ll also offer some high quality presets for user to choose. Finally, documentation for edge animation will be complete and we’ll also have some demo pages to show all effects of edge animation.

Besides, during the process of development, we found the source code need refactoring. So I also done some refactoring job to get it clearer and easier to understand.

Contribution to Project

Commits & Pull Requests

In ccNetViz project, I created:

  • 23 Pull Requests. (22 of them were merged)
  • 92 commits at main project and 14 commits at ccNetViz’s GitHub Pages project

All these pull requests and commits including:

  1. Animation features addition: including color animation, shape animation and easing effects.
  2. Examples for added features: example pages to demonstrate what new features look like.
  3. Refactoring of code: including code splitting and plugin architecture.
  4. Documentations: documentation for both animation features and plugin usage.

These contributions will be introduced in detail below.

Detail of Results

1. Edge Animation

The original ccNetViz only support static graph without change over time. I added several animation effects on graph edge so it can convey more semantic information like signal transmission in neural networks or blood flow in blood circulation system.
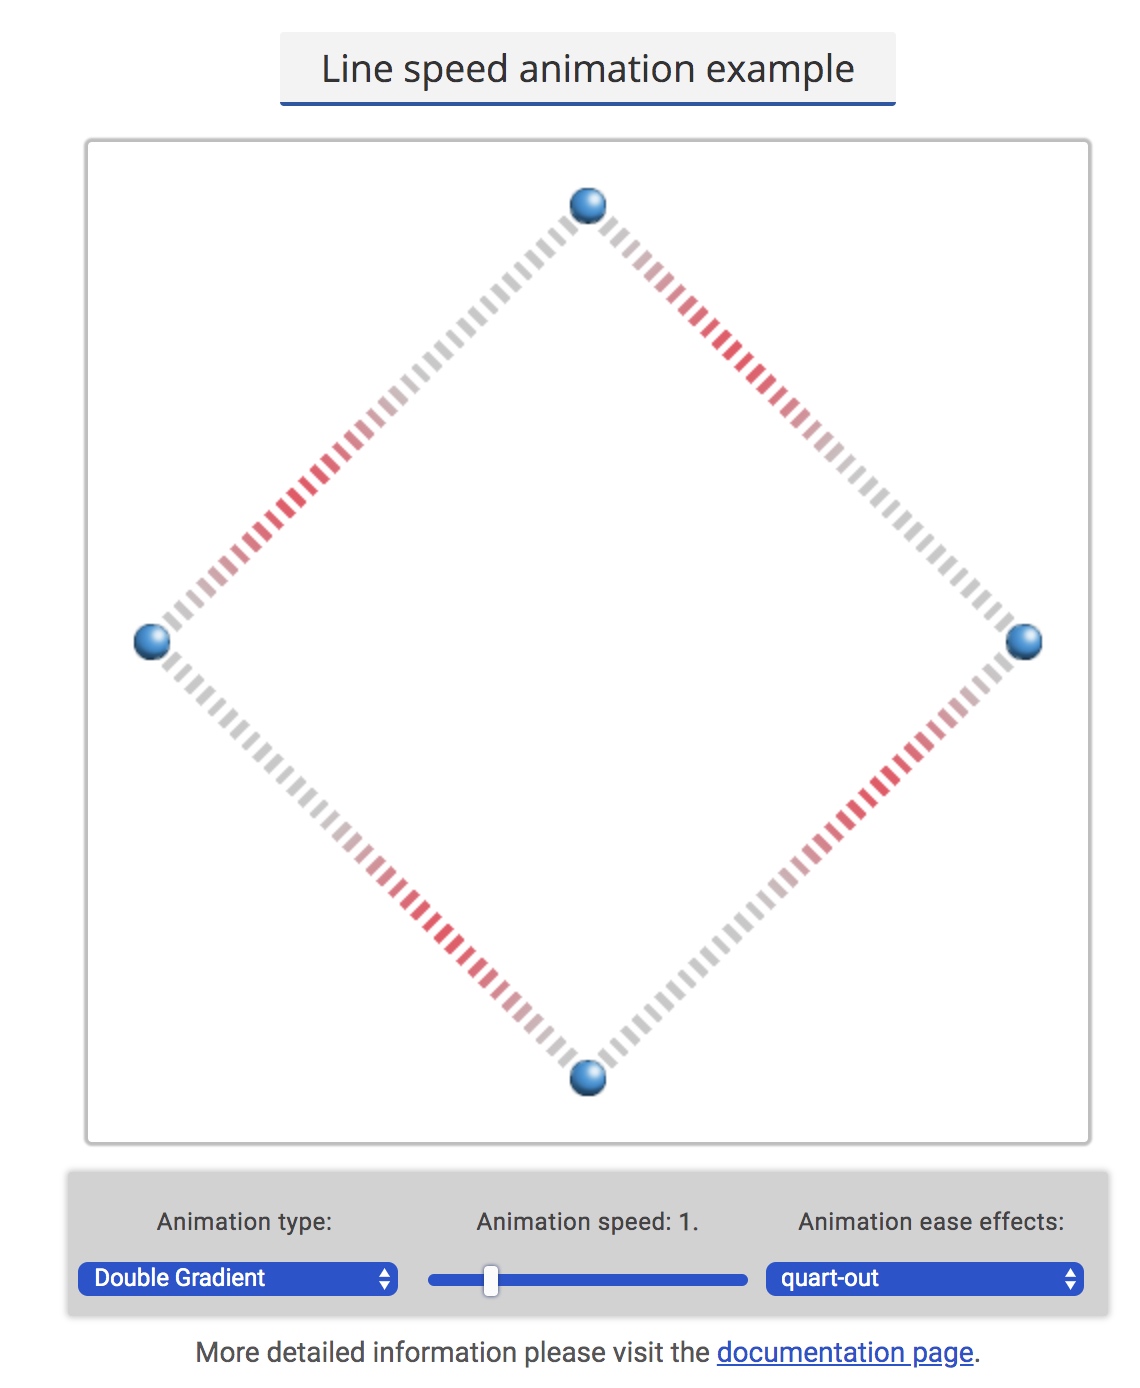
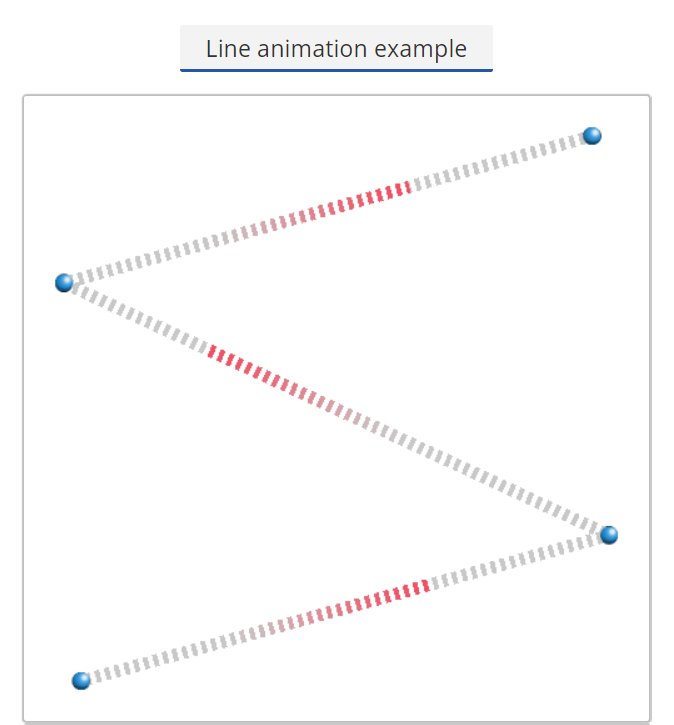
Color Animation

Basic idea of animation is using different color on edge. I implement three type of color animation:

gsoc-color-animation

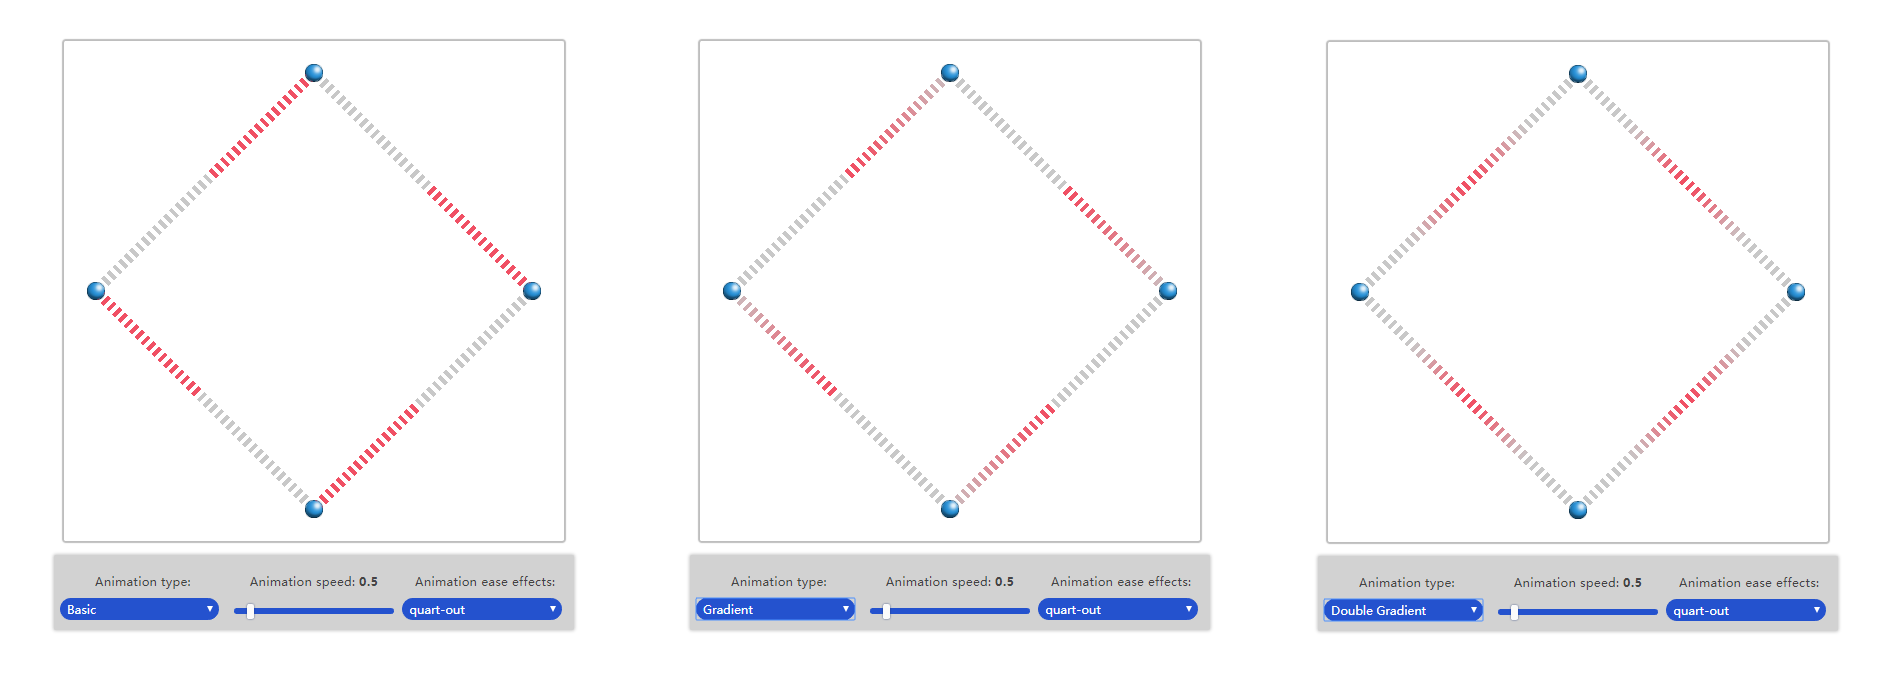
(The above example of color animation can be found here:
https://helikarlab.github.io/ccNetViz/examples/line_animate_complex.html

These three types of color animation are implemented in GLSL shader using similar control logic only with different animation color shape. Because animation is added, at entry of drawing we need add a draw loop to refresh canvas.
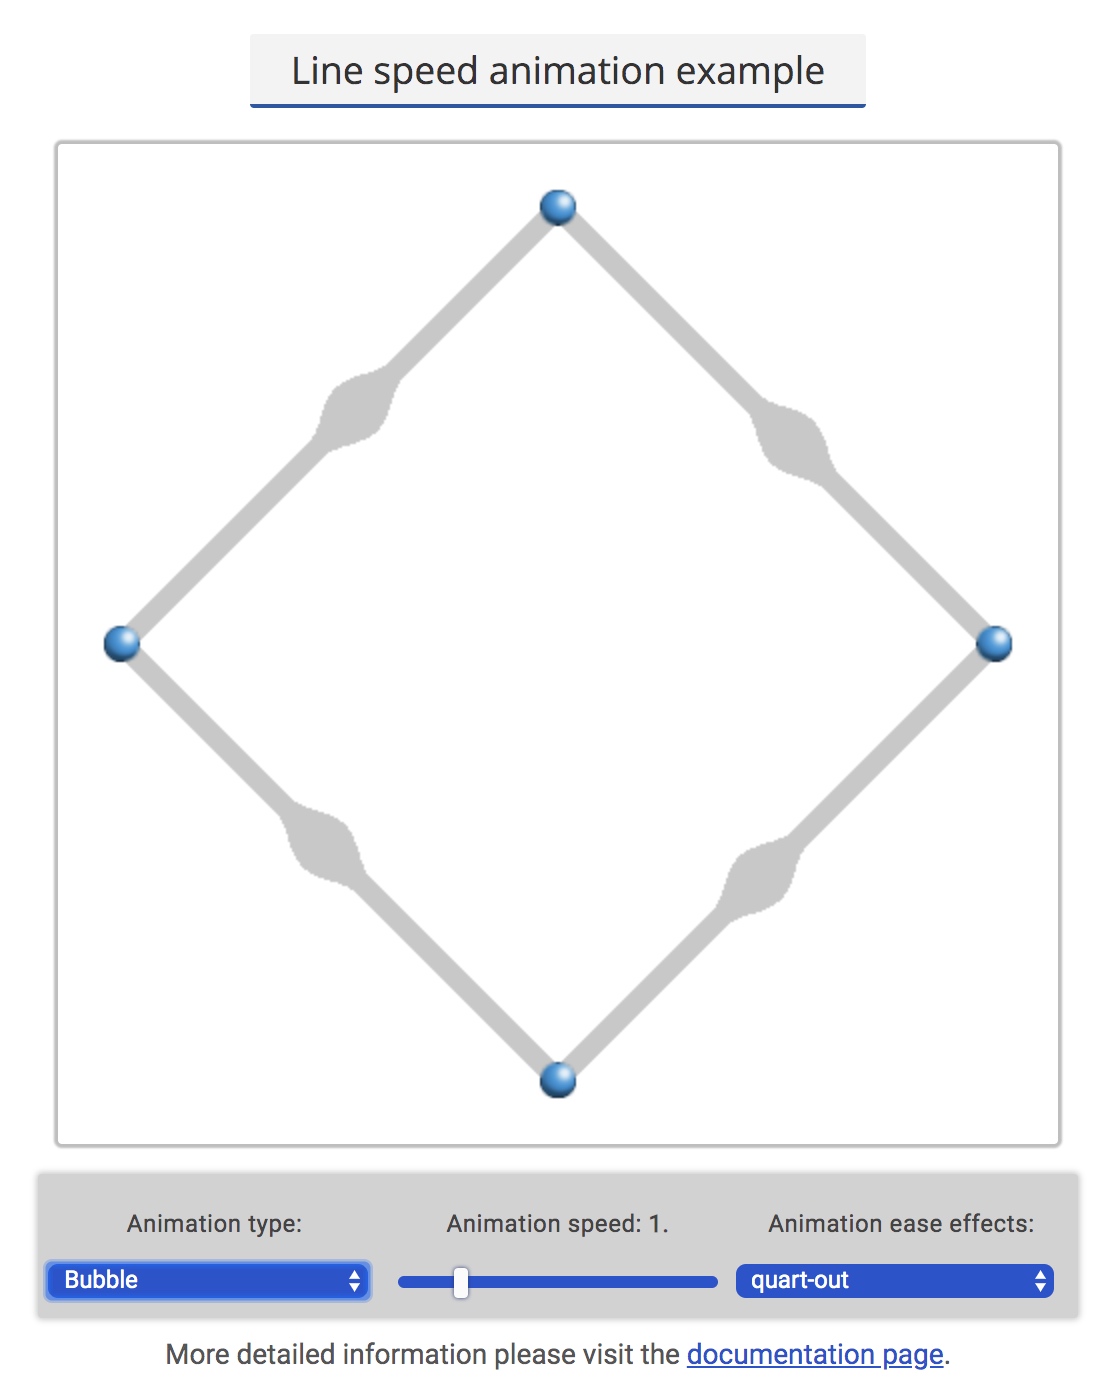
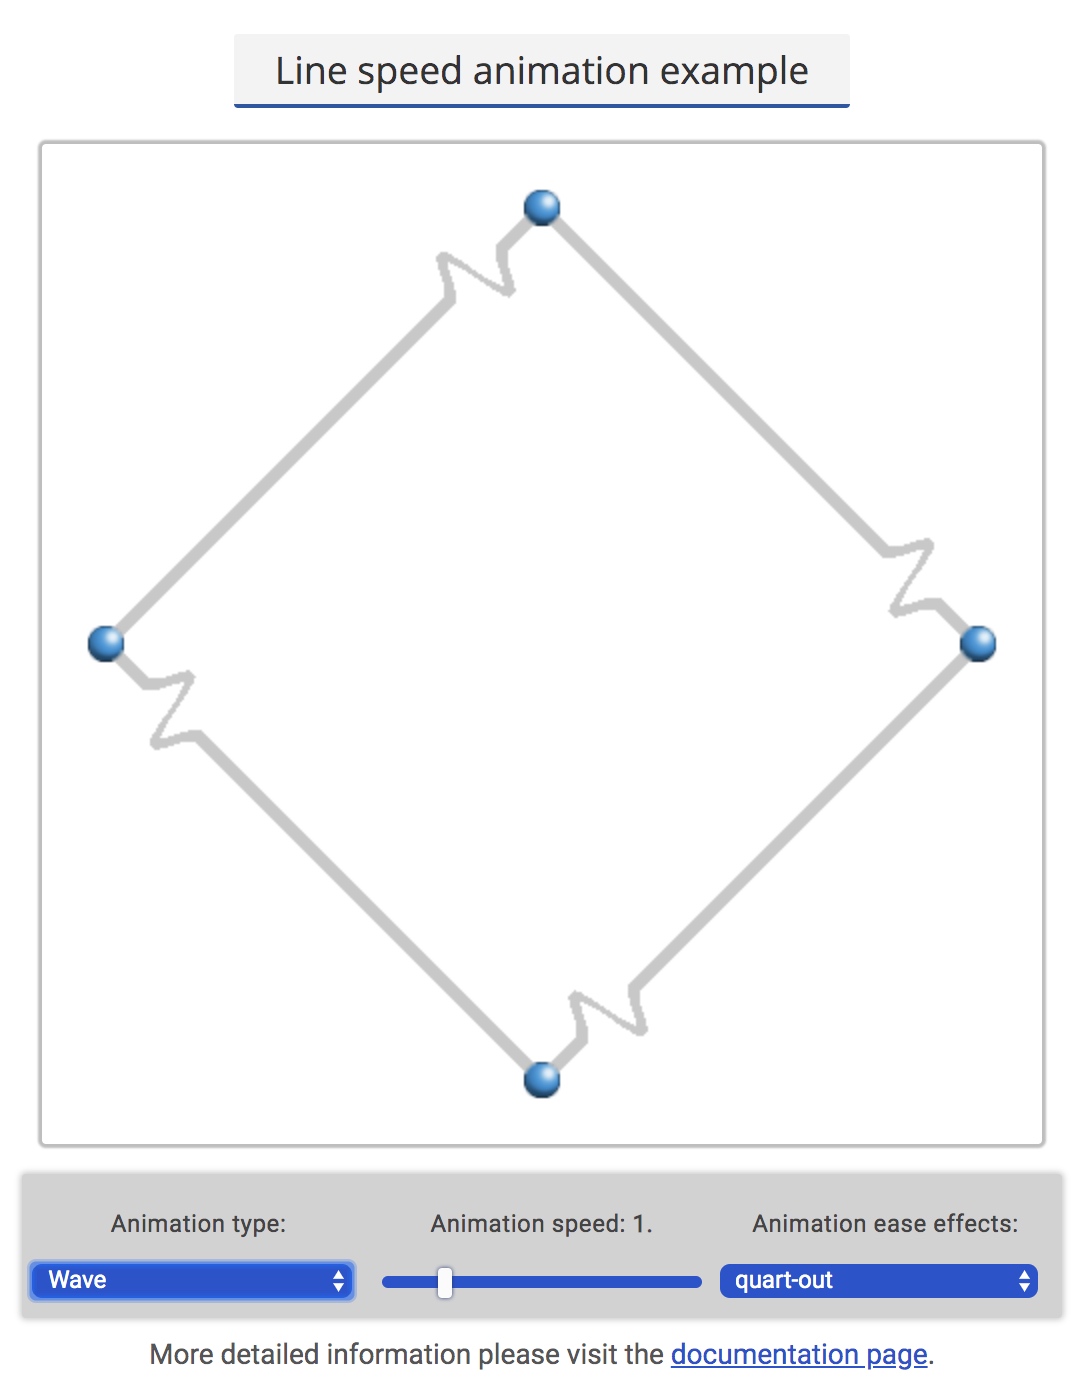
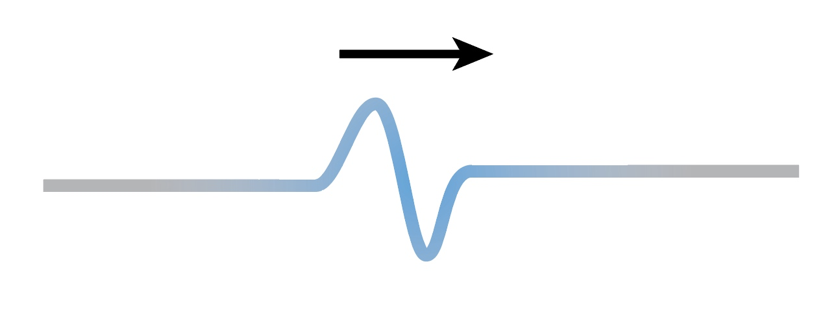
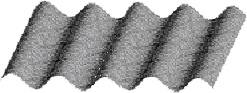
Shape Animation

Shape animation is a kind of more complex animation effects which I implement after color animation. I need to change original shape of edge and show different shapes. Sometimes the shape will show outside of original edge bound, which makes it difficult to implement.

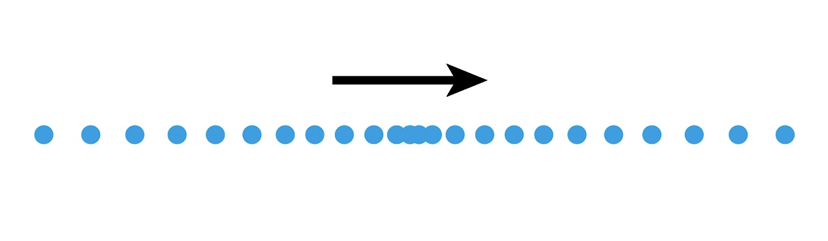
I added three features of shape animation in total, they are: wave effect, bubble effect, dotted effect:

gsoc-shape-animation

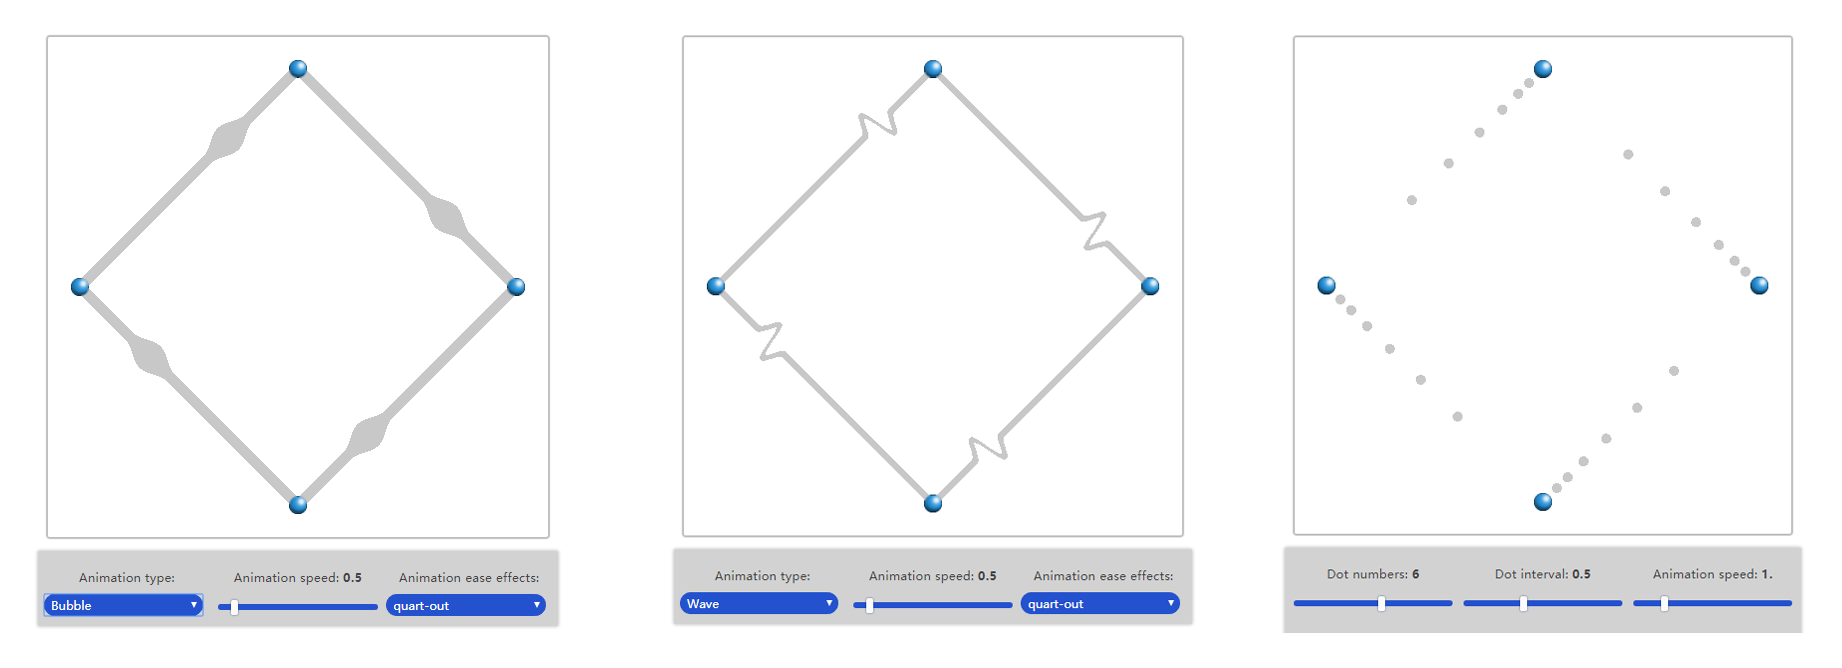
(The above example of shape animation can be found here:
https://helikarlab.github.io/ccNetViz/examples/line_animate_complex.html
https://helikarlab.github.io/ccNetViz/examples/line_animate_dot.html

The options about bubble animation and wave animation are same as color animation, including speed and easing effects. As for dot animation, it also contains other two options to configure: number of dots and interval of dots.

Easing Effects

To enrich the effect of animation, I add easing function on animation speed. According to this website: https://easings.net/en, I add all easing functions on it except from easeBack and easeElastic. Besides, I also add some other easing effects, basically the combination or modification of existing easings: sinInOutInv and quartInOutInv.

All these easing effects can be configured in line advanced animation example.
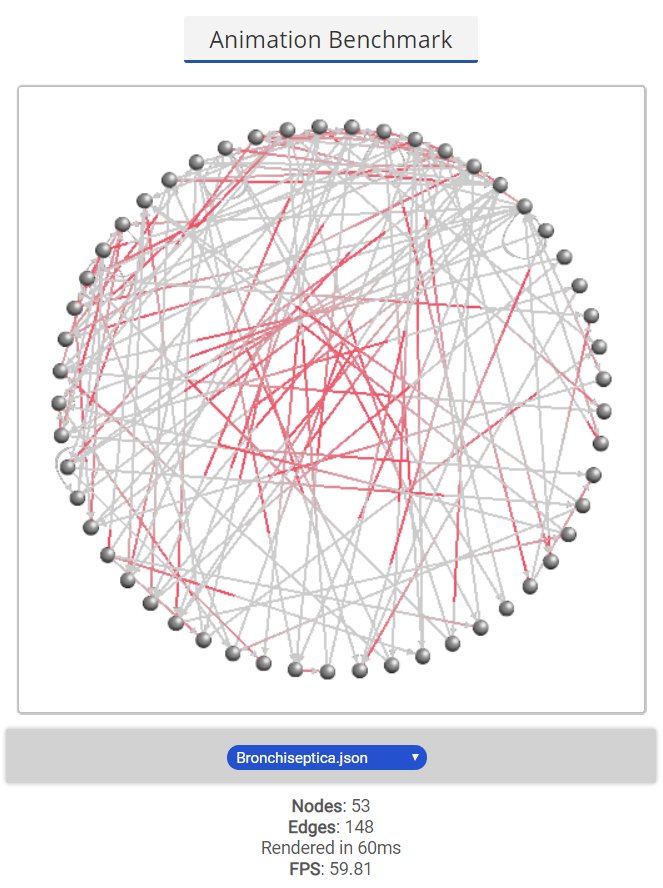
Benchmarks

The ccNetViz library is used for large scale graph visualization and the performance is essential when we add new features. So I do some benchmarks on edge animation and calculate its FPS. Below is screenshot of benchmarks:

gsoc-animation-benchmark

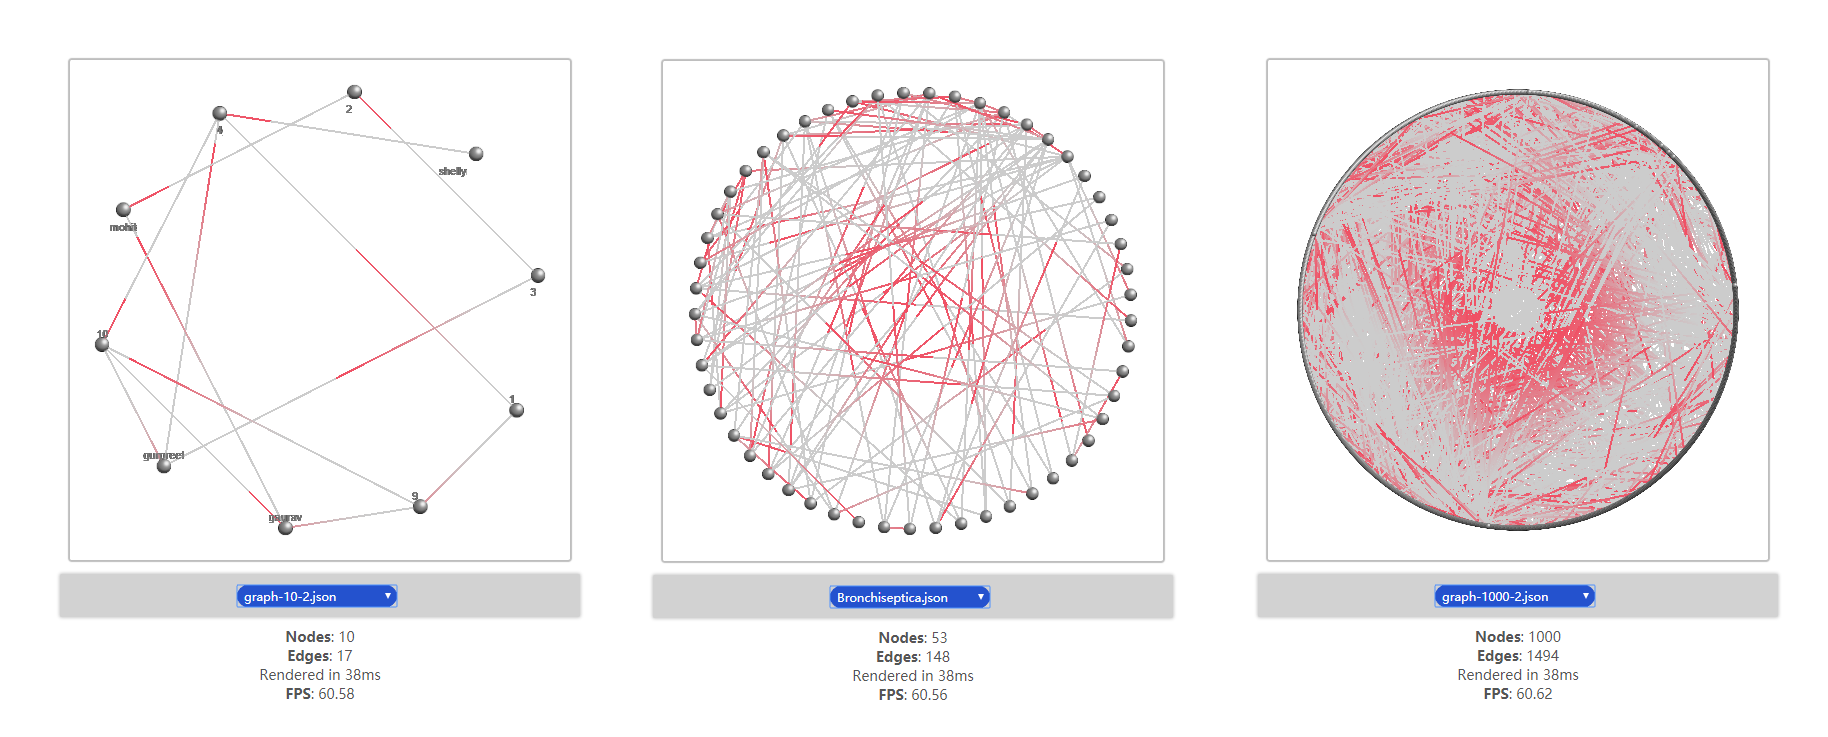
From benchmark results show above, we are inferred that under different scale of graph data, the animation keeps a relative good performance: about 60 FPS.

Examples

To display all effects of new animation features, I add four examples on ccNetViz’s website:
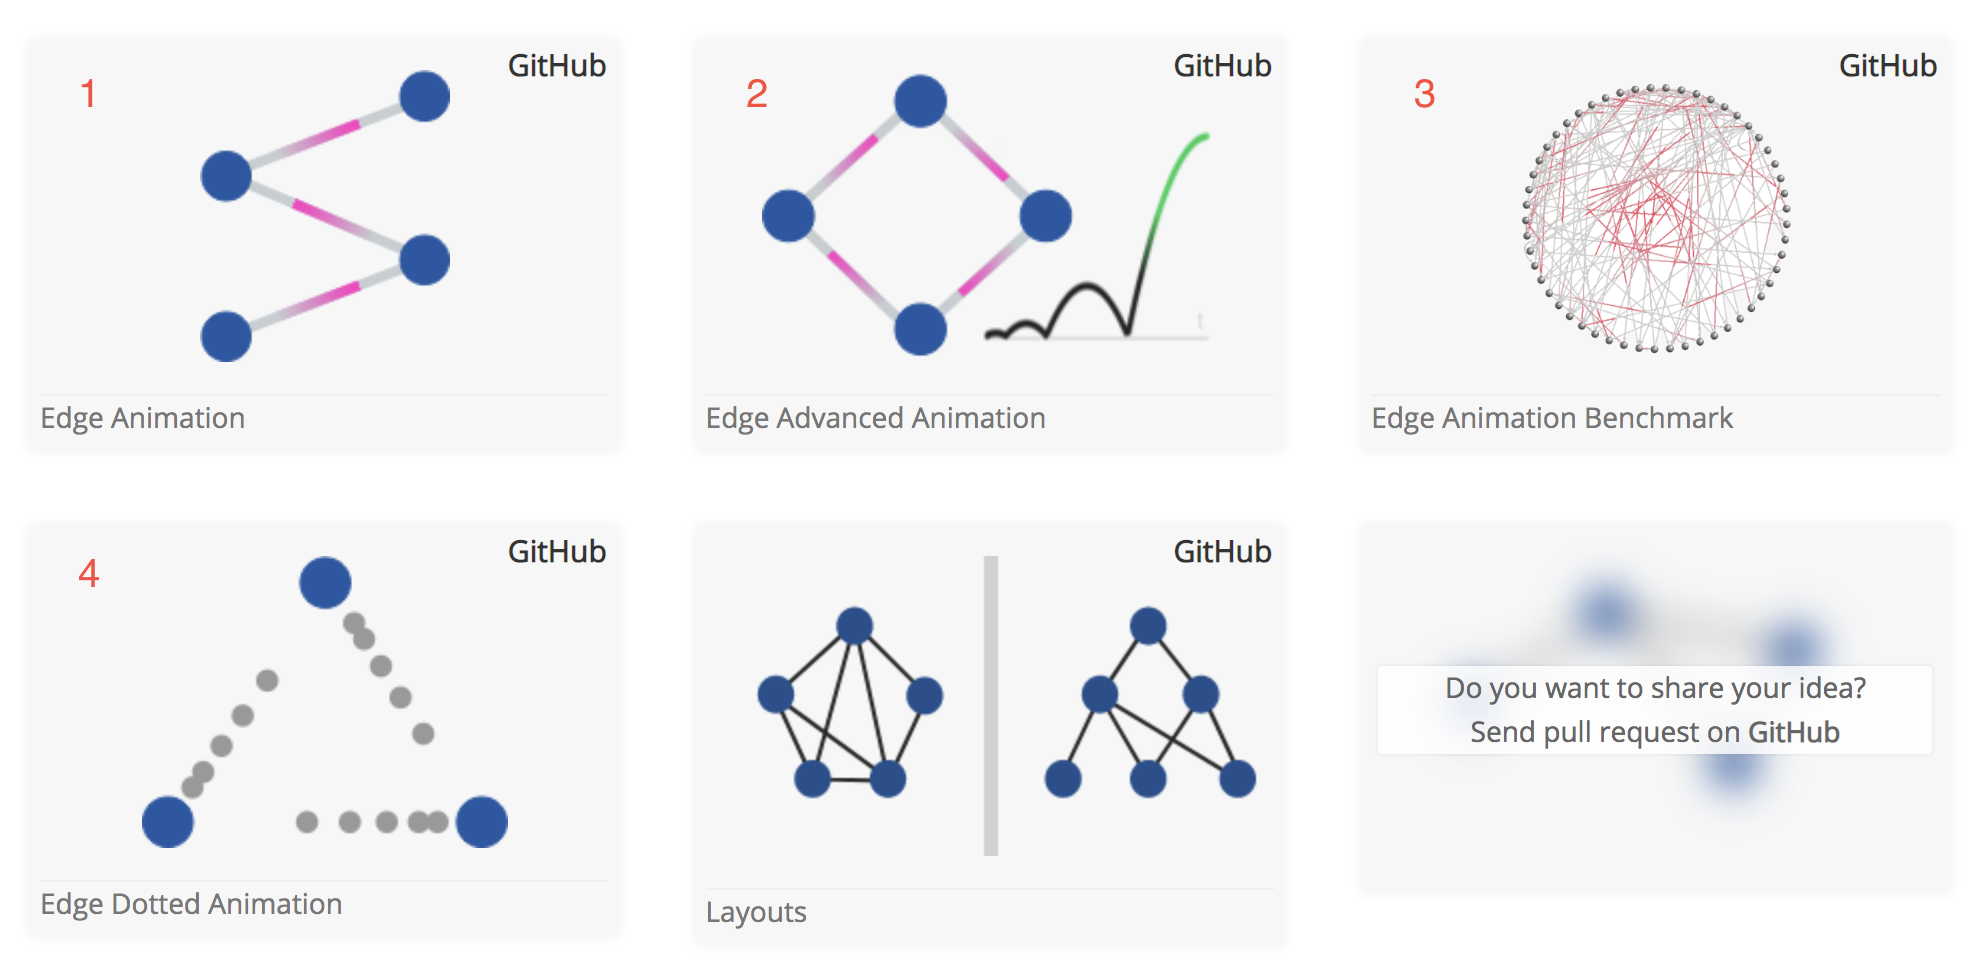
gsoc-animation-examples

They are:

  1. basic animation: initial example shows basic and gradient color animation
  2. advanced animation: shows all animation types except dotted effects and all configurable options
  3. dotted animation: shows dotted effects as well as its own options
  4. animation benchmark: benchmark results of edge animation

2. Code Refactoring

In addition to feature implementation, after discussion with my mentor, we found that it’s necessary to do some code refactoring work.

layer.js refactor

To add animation features, the core source code file I needed to understand and modify is layer.js in original code. But it contains more than one thousand lines. I spent a lot of time analyzing this file and added animation logic. Unfortunately, this made layer.js even bigger. One reason was that in ccNetViz, all elements like node, edge, label, arrow, were putted in layer.js together. When someone wanted to add any feature, it would extend this file.

The first ting I needed to do is to move GLSL shader code into separate files, because in original code it used concatenation of strings and made code long and hard to modify. I extracted all stings into .glsl files and use webpack’s raw-loader to load them.

Then I needed to do is to split different kinds of element into different files respectively. This step was hardest part during the who process. There were plenty of dependencies between each other. Finally, code related to same shape was put into same folder and the whole structure got clearer.

Finally, I also rearranged shader files and put them under shape’s folder respectively. After these steps, The original long and obscure layer.js no longer exist and is replaced by clear folder structure of several kinds of shapes.

Plugin architecture

When I was implementing animation features, I added a lot of codes to support new features, which made the size of whole library much larger. To keep ccNetViz lightweight, we finally decided to move animation features outside as a plugin so that it can be imported on demand.

I created a new webpack project and moved shaders of animation functions, easing functions as well as animation logic into it. And all these codes were combined as a new type of plugin: AnimationEdgePlugin and could be easily injected into original ccNetViz at runtime.

The description and documentation of new added animation plugin can be found here:
https://github.com/HelikarLab/ccNetViz/blob/master/plugins/animation-line/README.md

Things learned from Project

Last three months I have been working on this project and learned a lot during whole process. First of all, as a coding program, it’s a big boost to my programming skills. I only wrote some small demo programs of WebGL. It was my first time to handle a large scale project. And for efficiency consideration, most of my work was to write shader language of WebGL. I got a lot practice on shader programming. The code refactoring process helped me think like an architect of software and trained my code abstraction skills.

Another big benefit for me is that I learned a lot of collaboration and communication skills. I learned how to work with other developers together and contribute on a large project. I got familiar with some tools on GitHub for collaboration like issues, pull requests and code reviews. And at regular meeting every week with my mentor, I also practiced my expression skills to clearly state my problem and my thought.

In a word, I learned a lot from this three month program and these things will benefit me forever during my lifetime as a programmer.

Personal Feelings

This is my first time to attend GSoC, or more generally, this is my first time to do real contribution on open source project, so it’s really an amazing experience. Prior to this, I only opened issues for some projects on GitHub but never committed to them. But last three months I could not believe that I even committed more than 100 times on ccNetViz! It’s very rewarding to do contribution on open source library.

I’m very grateful for my mentor Ales. He helped me a lot during last few months. Every time I got stuck and did not know how to continue, he could always give me some constructive suggestions and got me out of woods. He’s a very nice and patient person. Sometimes I asked some ridiculous questions that I didn’t realize, but he always gave me positive suggestions. Without Ales’ help I could not working on this project smoothly.

Student Information

  • Name: Xiaodong Zhao
  • Email: zxd.brickmaker@gmail.com
  • GitHub: https://github.com/brickmaker
  • Website: https://brickmaker.github.io/

GSoC 2019 Phase Two

Posted on 2019-07-29 | In GSoC |

The July comes to the end and the second phase of GSoC are going to be over. During this month, I continue doing my job of GSoC following what I’ve written in my proposal and suggestions from my mentor. Finally, I have made some things and learned many things.


Done Work

During this period, my work mainly includes two part: one is refactoring layer.js file of ccNetViz source code. The other is adding more animation effects for ccNetViz library. Besides, I also add some examples and fix some bugs about added features.

layer.js Refactor

I almost spent first two week of this month to do refactoring on layer.js file. It’s a 2000 line around long source file and is so complex that I as well as other developers could not understand each part of it. So according to suggestion of mentor Ales, I refactored this file in a relative shallow level. I split this file according to different shape or element into several folder respectively and in top level, index.js of layer folder, I import all these parts so it will realize the original functions.

More Animation Effects

In phase one of this program, I added several color animation effects, including basic binary color animation and little advanced gradient color animation. During this month, I continue add new animation features.

First I added a new color animation called double gradient, it looks like this:

-w570

It’s similar with previous color animation but with gradient color at both side of animation position.

This month I also implemented two shape animation, animation using some kind of shape movement. Till now I added bubble animation and wave animation.

The bubble animation looks like following:

-w554

At animation position, the bubble-like shape will be shown on edge and as time changes, the bubble will move from start to end. Through this, it looks like that there’s some liquid flow along the edge.

The wave animation looks like:

-w544

It shows some pulse move from source node to target node.

Bug-fix and Examples

During the implementation process, through I add more features, I also bring more bugs to our project. So I spend some time fixing these bugs.

It includes:

  • Old example not compatible with new library, including: SDF font example, circular example, multilevel example
  • animation cannot interact with pan&zoom problem
  • bubble animation, multi bubble after interaction bug

I also added several example on GitHub pages of our library:

-w1074

Implementation Detail

shape animation

Shape animation if quite different comparing to color animation. Color animation basically uses a different color at animation position and without draw things outside the edge or erase part of edge. But shape animation has to do so. For example, bubble animation need to draw extra part around animation position outside the bound of edge. Wave animation is even more complex. It needs not only draw extra part, the wave part outside edge, but also needs to not draw on edge where there’s a wave shift.

First I have two thoughts. One is to draw a customized shape instead of rectangle and realize certain shape animation. But it requires more complex structure because WebGL has to concat many small triangles and combine them to a free shape. It’s very inefficient for performance and hard to calculate shape with animation position changes over time.

So I choose to draw rectangle just like color animation. But I draw a wider one so it can include max width of animation shape like a wave. And I process this large rectangle in fragment shader and cut it to destination shape.

Faced Challenges

Refactoring

Actually the process of refactoring layer.js is not so successful. I got stuck at start and could not know how to find an entry point. I tried to simply split code related to different elements and finally the whole code was broken. Because there are many dependancies among all these parts. I should not split them directly.

At that time, my mentor gave me much help, he pointed out a clear architecture and I just followed his and did refactoring step by step and finally done this job.

Animation with Pan&Zoom

After I implemented bubble animation. There were many bugs in it. A vital bug is that the animation would be broken if I pan or zoom use mouse. I spent a lot of time finding where this bug happened. At the end, I figured out that my position of source node and target node were not updated after mouse interaction. The animation used old position but the canvas showed graph with new position.

After I found this problem. I made a transform at vertex shader, multiplied the position array with viewport transform matrix and got new position and passed new position to fragment shader. Now the animations can work well with pan&zoom.

Personal Feelings

This month is quite different from first month. First month I met a lot of novel things like working for open source group, contributing on GitHub, send PR and fix bug and so on. This month, I already familiar with these processes and I become a trained developer. So I think I become more efficient when developing. It’s really an satisfying thing.

This month I faced some problem and got stuck for some days. It felt no good for me. But thank to my mentor Ales, he gave me a lot of help and even instruct me writing code line by line. I learned a lot from him.

Plan&Thought for Phase #3

Looking back in my proposal, I found that I only left dotted shape animation not implemented. This will be my main job at next week.

image005

After I implemented this, I basically done all features. And then I will focus on demo and examples, as well as documentation.

But before that, an important work is to make all options of animation configurable. Currently many options are fixed with some magic number. Next step, I should make them all customizable for user. After that, I will add documentation for these options.

GSoC 2019 Phase One

Posted on 2019-07-07 | Edited on 2019-07-09 | In GSoC |

Unconsciously, the timeline for GSoC 2019 program has passed its first phase of coding period. Looking back in this period of time, I find that I’ve walked far from the starting point on the road of GSoC.

In this article, I’ll summarize what I’ve done, what I’ve learned and what my feelings are.


About the Project

Basic Information

My project for this program is Edge Animations for Large-Scale Network Graphs from Computational Biology @ University of Nebraska-Lincoln, or simpler, Helikar Lab. My mentor is Ales Saska, a very nice person!

Main Job

My main job is to add some features for ccNetViz, a library for rendering and operating with large-scale network graphs. As I written in my proposal, these features including:

  1. Edge animation effects:
    1. show animation effects with color or shape change
    2. with speed control options and including some advanced ease effects
  2. Demos to show animation effects, with options so that user can configurate
  3. Documentation for edge animation to tell people how to use it

Technique Stack

  • JavaScript: This is a JavaScript library and mainly written in JavaScript
    • Webpack: We use webpack to pack up JS files and arrange JS codes
    • Babel: To transcompile JS code so they can be used in old browser
  • WebGL: The main function for rendering is implemented using WebGL to accomplish high efficiency
    • GLSL Shader: We use GLSL shaders to do complex calculation, including edge animation
  • Others: Use some other library or tool to assist development
    • ESLint: lint and regulate our code
    • prettier: format code and keep the consistency among all developers
    • commit-lint: restrict commit message to certain standard

Why this one?

During the period of choosing project to participate in. I’ve spend a lot of time knowing about all kinds of organizations and projects. But I found that It was very hard to find a project with technique stack of WebGL and Graph Visualization, until I got this one. I will continue study for a master degree in Computer Science, specifically, Data Visualization. So I think this project is very suitable for me. One reason is that I have similar skills like WebGL and JavaScript which are compatible with this project so I can get start soon and contribute more on it. Another is that through this project, I’ll also experience a lot and learn a lot.

Done Work

After the community bound period, I’ve been familiar with my organization and mentor. Besides, I also done a few contribution to get me involved quickly. In the first phase of coding period. I followed what I have written in my proposal and suggestion from my mentor and got a reasonable result.

In one word, what I’ve done in this phase is adding edge color animation with a few configuration options to ccNetViz library.

Color Animation

1562378706731

As the picture shows, with edge animation, the color of certain part of edge will change to red and will move from source node to target node with time. With this effect, it may indicate that something flow in edges.

Configuration Options

1562379194127

Like other options for node or arrow. I also added some options to control the effects of edge animation. It includes:

  1. Animation type: control the color change shape on edge, has three options:
    1. None: without animation
    2. Basic: pure color between start point and reached location
    3. Gradient: gradient color at reached location
  2. Animation speed: specify the speed of movement.
  3. Animation ease effects: It’s little boring if the animation speed is linear, which means the speed keeps same all the time. So I added some easing effects on animation speed following this site: https://easings.net/en. The options including most of easing functions in it.

Benchmark

The ccNetViz library mainly focuses on visualizing and operating on large-scale graph data. So the efficiency is very important. If edge animation is two slow to render or interact smoothly, it will be unbearable.

So I use real dataset to test animation efficiency as the figure shows:

animate-benckmark

I added FPS calculation function for ccNetViz so it can live update the render loop times. The benchmark results show that with animation, the quality of graph is worse that one without animation. But the FPS of animation keeps at around 60 regardless of how large dataset we use. Maybe because I put all animation function into shaders and GPU is faster for this kind of computation.

Implementation Detail

Animation position calculation

Every frame we need to update the color change position. So we have to draw graph with new parameters. Here we pass the render time since start.

1
2
3
4
5
const drawLoop = () => {
context.renderTime = (Date.now() - startTime) / 1000.0;
drawOnce();
requestAnimationFrame(drawLoop);
};

Then we can set uniform in shader and fragment shader will handle where animation color should be drawn according to time. For example:

1
float pos = fract(v_time) * edgeLen;

Color animation effects

Simplest method to show animation through color, is to draw part of edge from start position to animation position by animation color, and the other part with original color. It can be simple written as:

1
float draw = 1. - step(pos, edgeLen);

But if we want some advanced animation effects, like gradient color at animation position, we have to write more complex mask function. For example:

1
float draw = fract(smoothstep(pos - gradLen, pos, edgeLen));

It will show a gradient color block of length gradLen right after pos.

Easing effects of animation

This page: https://easings.net/en, gives an intuitive presentation of different easing function. It’s cool if I can add them to color animation. Finally, I found an open source implementation of them on GitHub: https://github.com/glslify/glsl-easings. All I want to do is import them and add ease function before fract function like this:

1
float pos = ease(fract(v_time)) * edgeLen;

Faced Challenges

Existing code structures and functions

My first job of this program is to read existing code of project. This library already has many complex features so there are lots of modules in it. At first I have no idea of its structure and relation between different files. I asked Ales for help and he instructed me to focus on layer.js file and read its code and shaders. Then I started understanding ccNetViz’s mechanisms and added my code into it.

Animation speed control

For the first time, I basically fract time to range between 0 and 1 and used this factor to multiply totalLen and got animation position. But there was a problem. When coming edges with different length, the speed of animation will not be same. Longer edge will have higher speed. To make animation of all edges with same speed. I tried to use maxLen(window’s diagnal length) as base Length and for each edge, I use length of edge divides maxLen. After that, I get animation speed relate to its length. Longer edge will have longer cycle time and thus guarantee consistent speed.

Shader file loading

The original method to add shader code into project is using array of strings and concat them into a long string. It did work and simple in some extent. But It was very unfriendly for developer because we had to carefully watch on typo during coding and multiple arrays are also somewhat messy.

At beginning, I also wrote shader code in this way, but finally It got more difficult for me. Then mentor Ales suggested me to use webpack and raw-loader to loader text file. So I can split all shader code into individual files and import them. And with some pulgins of IDE, It even has code highlight.

Personal Feelings

This is my first time to do real contribution on open source project, so it’s really an amazing experience. Prior to this, I only open some issue for some projects on GitHub but never commit to them. But during this month, I even contributed tens of commits on ccNetViz. When I saw the project manager merged my pull request, I just thought that there will be thousands of people that can use features that I’ve written!

This month, I learned a lot from my mentor, Ales. He’s a very nice and patient person. I remembered that my first PR actually did some damage to the project. Thanks to Ales that point out my problem and let me fix it. Sometimes I found that I have no idea how to continue in a certain direction and Ales always could give me some very useful tips which help me out of woods.

I also learned a lot during this month. I learned some tools for team collaboration development, including ESLint and Prettier that help us normalize code, git-cz to do semantic git commits and Pull Request mechanism to deal with multiple contribution. Besides, I got a deeper understanding of WebGL and shaders. Basically I implemented all vital features using shaders. It’s faster and more powerful than I thought before.

Plan&Thought for Phase #2

I think for animation there are two factors. One is the speed of animation over time. The other is animation effects, or animation type. For speed factor, I’ve done it in phase #1. We can control the speed and ease effects of animation. I think that’s enough. So, at next phase, my biggest problem will be the animation type.

I’ve implemented two animation type, both about color change on edge. They show below:

image001
image002
Besides, I also mentioned double gradient color effect in my proposal, it looks like this:
image003
So my first job is to add this color effect into ccNetViz.

After that, I’ll focus on the animation with edge’s shape deformation. It’s much more difficult than color change on edge. Currently, I propose three types of animation effect show below:

image004
image006
image005
The first and the second are similar. They both have edge shape deformation at certain position on edge. The last one may be more troublesome, it includes whole change of edge.

These three types of animation, will be my main job during the following three or four weeks. Because I don’t know how to implement it yet, I have to research on them or learn some tricky skills of WebGL shaders. I thinks with the power of fragment shaders, I’ll finally find the right way to do it.

Web开发中的用户系统(一)

Posted on 2019-02-02 | Edited on 2019-02-10 | In Web |

好多Web场景中都会用到用户系统。但Web基于的协议是一个无状态的协议,于是出现了许多幺蛾子来解决,这些的确让自己很头疼,自己一直以来都没怎么搞明白,甚至好多名词都不知道。这次,下定决心了解一波,总结一下。

任务有如下:

  1. 了解用户系统的一堆名词,authentication、authorization、OAuth、OAuth2、JWT、Session、token等等
  2. 理解实现用户认证和授权的方法与流程
  3. 了解主要的用户系统实现方案
  4. 选择一个库/方案,实现一个用户系统

概念

authentication & authorization

翻译的话,authentication:认证;authorization:授权

StackOverflow上的回答很好了:https://stackoverflow.com/questions/6556522/authentication-versus-authorization

简单的说,认证是确认当前操作的的确是某人操作的;授权是确认当前操作是某人权限范围内。

回答里有人说这是Orthognal的,互不相干的,但我感觉还是有关系的吧,没有认证,哪来的授权?

了解概念,其实就是知道这是俩东西,需要各自考虑和处理。

session

一直不了解session是个什么东西,捉摸不透,看了好多博客、tutorial,发现也各有各的说法,仍然很迷。

感觉,session所指的东西,应该有两种意思,一种是抽象的,接近session英文单词的本意,说的就是一种机制,一种实现有状态会话的机制;另一种是具体的,是指这种机制(有人称之为cookie-session机制,我觉得挺好)下,存在服务器上的那个东西,可能好多库都这样叫,于是人们也这样叫吧,我觉得取名sessionInfo应该会更好。

JWT, token

JWT是一种方案/机制,这是自己知道的,所谓的token-based authentication,基本指的就是JWT这个机制了。

这篇文章看了感觉讲的还挺清楚的:https://dzone.com/articles/cookies-vs-tokens-the-definitive-guide

OAuth, OAuth 2.0

这两个应该是标准,全称是Open Authorization,2.0是最新版?大概是这个意思吧。

有官网:https://oauth.net/2/

Wikipedia:

开放授权(OAuth)是一个开放标准,允许用户让第三方应用访问该用户在某一网站上存储的私密的资源(如照片,视频,联系人列表),而无需将用户名和密码提供给第三方应用。

OAuth允许用户提供一个令牌,而不是用户名和密码来访问他们存放在特定服务提供者的数据。每一个令牌授权一个特定的网站(例如,视频编辑网站)在特定的时段(例如,接下来的2小时内)内访问特定的资源(例如仅仅是某一相册中的视频)。这样,OAuth让用户可以授权第三方网站访问他们存储在另外服务提供者的某些特定信息,而非所有内容。

所以,简单来说的话,就是当一个应用想用第三方应用的信息比如Google的昵称和头像的时候,有权限得到,而不用得到Google的账号和密码。

本质上和用户系统没有什么关系,其实当用户用第三方登录的时候,只是用了第三方的某些信息注册了一个新用户罢了,没有什么神奇的地方。

OpenID

似乎是一个凉了的东西,做authentication的,那就不管它了

Auth0

跟着官网的一些指示写了一些东西。

https://auth0.com/

总的来说,这是一个用户系统的服务吧,把好多做好了,可以直接用,全权管理自己的用户,甚至包括第三方的登录。

集成到自己的app中有点麻烦,没有跟着tutorial走完,大致感觉是Auth0去维护用户,包括authentication和autorization(通过插件的形式),自己只要来了Auth0的token,Auth0确认下身份和权限然后进行后续的操作就可以了,应该是比较省心的,但也比较黑盒。

如果快速搞一个用户系统的话,或许,这的确是最好的选择,就像介绍视频说的那样。不过,一般的公司都有自己的用户系统,而个人开发的话,或许也没有很严格的用户系统需要,随便能够authentication就可以了,说不定authorization都是假的hh

passport.js

Passport is authentication middleware for Node.js.

所以说,这是更方便的进行authentication

原来需要手动的去做比如用户名+密码审核的工作,它会帮忙更简单的做。
原来需要手写OAuth认证流程的,它也有插件帮忙做。


以上,疯狂查各种博客,网页的结果,没有经过任何的实践,好多都是自己脑补的。

自己还是对用户系统这一块不是太懂,接下来实践一波,实现一个简易的用户系统,来看看这些东西。

Python中矩阵的使用

Posted on 2019-01-26 | Edited on 2019-01-27 | In Machine Learning , Python |

在机器学习中,经常会用到矩阵,在python语言中,向量、矩阵等抽象概念如何表示和使用,自己之前一直有些搞不明白,今天就试着总结下吧。


问题

自己需要明确的一些问题:

  • python中list,二维list如何操作
  • numpy中array,二维array如何操作
  • python list和numpy array的区别,转化
  • 向量如何表示
  • 矩阵的一些常用操作
  • 向量、矩阵的运算

list

python内置了list,也就是数组,可以用来表示向量和矩阵:

1
2
3
4
5
6
7
l = [1, 2, 3] # 1-d list
l[:] # [1, 2, 3]
l[:2] # [1, 2]
l[1:] # [2, 3]
l[1] # [2]
l[-1] # [3]
l[-2] # [2]

关于下标,文档里一张图说的很清楚:

1
2
3
4
5
+---+---+---+---+---+---+
| P | y | t | h | o | n |
+---+---+---+---+---+---+
0 1 2 3 4 5 6
-6 -5 -4 -3 -2 -1

2d-list:

表示矩阵可以用python的2维list:

1
2
3
4
5
6
7
mat = [
[1, 2, 3],
[4, 5, 6]
]
# mat
# [[1, 2, 3], [4, 5, 6]]

表示上呢,python内置的list也就这么回事,具体使用的时候,有一些操作还是值得注意的。
关于list所有可以的操作,文档中给出了:https://docs.python.org/3/library/stdtypes.html#sequence-types-list-tuple-range
(真难找,python的文档咋这么不清楚,把reference和tutorial放在一起的感觉,不喜欢)

+和*的操作,就是concat:

1
2
3
l = [1, 2, 3]
l + l # [1, 2, 3, 1, 2, 3]
l * 3 # [1, 2, 3, 1, 2, 3, 1, 2, 3]

NumPy Array

在机器学习中,好多代码第一行就是import numpy as np哈哈,的确,用numpy的array会更多一些,操作也更丰富一些

ndarray对多维支持很友好,从名字就可以看出来

基本属性

常用的有:

  • ndim
  • shape
  • size
1
2
3
4
5
6
7
8
9
10
11
12
13
14
15
16
17
18
19
20
21
22
23
24
In [7]: a = np.array(
...: [[1, 2, 3],
...: [4, 5, 6]]
...: )
In [8]: a
Out[8]:
array([[1, 2, 3],
[4, 5, 6]])
In [9]: a.shape
Out[9]: (2, 3)
In [10]: type(a.shape)
Out[10]: tuple
In [11]: a.dtype
Out[11]: dtype('int64')
In [12]: a.ndim
Out[12]: 2
In [13]: a.size
Out[13]: 6

创建

直接从list创建:

1
2
3
4
5
6
7
8
9
10
11
12
In [16]: np.array([1, 2, 3])
Out[16]: array([1, 2, 3])
In [17]: np.array([[1, 2, 3], [4, 5, 6]])
Out[17]:
array([[1, 2, 3],
[4, 5, 6]])
In [18]: np.array([(1, 2, 3),(4, 5, 6)])
Out[18]:
array([[1, 2, 3],
[4, 5, 6]])

用方便的一些填充函数:

1
2
3
4
5
6
7
In [22]: np.zeros((2, 3))
Out[22]:
array([[0., 0., 0.],
[0., 0., 0.]])
In [23]: np.zeros(3)
Out[23]: array([0., 0., 0.])

类似的还有np.ones()和np.empty()

用np.arange()或者np.linspace()生成一定间隔的数据,其实用的比较少

运算

numpy文档:

Arithmetic operators on arrays apply elementwise. A new array is created and filled with the result.

所以,一些基本的操作就明确了,比如:*, **等
特别要注意是*,并不是矩阵乘法,而是elementwise的乘法

sum, min, max:

1
2
3
4
5
6
7
8
9
10
11
12
13
14
15
16
17
18
19
In [9]: a = np.array([[1,2,3],[4,5,6]])
In [10]: a.sum()
Out[10]: 21
In [11]: a.sum(axis=0)
Out[11]: array([5, 7, 9])
In [12]: a.sum(axis=1)
Out[12]: array([ 6, 15])
In [13]: a.min(axis=0)
Out[13]: array([1, 2, 3])
In [14]: a.min()
Out[14]: 1
In [15]: a.max()
Out[15]: 6

当然也可以用python自己的函数min, max, sum,这其中应该会有一个cast的过程

shape操作

1
2
3
4
5
6
7
8
9
10
11
12
13
14
15
16
17
18
19
20
21
22
23
In [16]: a
Out[16]:
array([[1, 2, 3],
[4, 5, 6]])
In [17]: a.reshape(3, 2)
Out[17]:
array([[1, 2],
[3, 4],
[5, 6]])
In [20]: a.reshape(3, -1) # -1表示自动计算
Out[20]:
array([[1, 2],
[3, 4],
[5, 6]])
In [21]: a.resize(3, 2)
In [22]: a
Out[22]:
array([[1, 2],
[3, 4],
[5, 6]])

stack & split

hstack vstack:分别水平堆叠和垂直堆叠

hsplit vsplit: 分别水平气氛和垂直切分

copy

  • no copy (alias): b = a
  • shallow copy: b = a.view()
  • deep copy: b = a.copy()

vector vs. matrix

之前自己一直有疑惑的是,numpy中的vector和matrix有什么关系,是不是一样的。
因为,在运算的过程中,经常需要矩阵和向量之间进行运算,有时候会有对不齐的操作。

经过了解,明确了,一维数组和矩阵中的行向量或者列向量是不一样的!不能直接进行运算!!

两者的相互转化及运算:

1
2
3
4
5
6
7
8
9
10
11
12
13
14
15
16
17
18
19
20
21
22
23
24
25
26
In [43]: a = np.array([1, 2, 3])
In [44]: rv = np.array([a]) # 转换成行向量,(3,) -> (1, 3)
In [45]: rv
Out[45]: array([[1, 2, 3]])
In [46]: cv = np.vstack(a) # 转换成列向量,(3,) -> (3, 1)
In [47]: cv
Out[47]:
array([[1],
[2],
[3]])
In [48]: cv @ rv
Out[48]:
array([[1, 2, 3],
[2, 4, 6],
[3, 6, 9]])
In [52]: rv[0] # 行向量 -> array
Out[52]: array([1, 2, 3])
In [53]: cv[:, 0] # 列向量 -> array
Out[53]: array([1, 2, 3])

总结

用NumPy的array,会比自带的强大很多!

一维array和矩阵中的行向量和列向量不一样!

NumPy的文档还是很清晰的,有问题找文档!(Python的文档是真的辣鸡呀~)

NA(Numerical Analysis) Lab总结

Posted on 2019-01-20 | Edited on 2019-01-21 | In Math , Numerical Analysis |

数值分析的8个LAB做完了,这八道题,可以说是自己做过的课程里边最难的作业了,最难但并不玄学!值得记下来,来纪念自己在这八道题上花费的时间和精力!

这八道题似乎很多年没有变过了,所以,说不定对之后的学弟学妹估计有些帮助吧~


Q1. Numerical Summation of a Series

题目

6-1 Numerical Summation of a Series (30 分)

Produce a table of the values of the series

for the 3001 values of x, x = 0.0, 0.1, 0.2, …, 300.00. All entries of the table must have an absolute error less than $10^{-10}$. This problem is based on a problem from Hamming (1962), when mainframes were very slow by today’s microcomputer standards.

Format of function:

1
void Series_Sum( double sum[] );

where double sum[] is an array of 3001 entries, each contains a value of $\phi(x)$ for x = 0.0, 0.1, 0.2, …, 300.00.

Sample program of judge:

1
2
3
4
5
6
7
8
9
10
11
12
13
14
15
16
17
18
19
#include <stdio.h>
void Series_Sum( double sum[] );
int main()
{
int i;
double x, sum[3001];
Series_Sum( sum );
x = 0.0;
for (i=0; i<3001; i++)
printf("%6.2f %16.12f\n", x + (double)i * 0.10, sum[i]);
return 0;
}
/* Your function will be put here */

Sample Output:

1
2
3
4
5
6
7
8
0.00 1.644934066848
0.10 1.534607244904
...
1.00 1.000000000000
...
2.00 0.750000000000
...
300.00 0.020942212934

Hint:

The problem with summing the sequence in equation (1) is that too many terms may be required to complete the summation in the given time. Additionally, if enough terms were to be summed, roundoff would render any typical double precision computation useless for the desired precision.

To improve the convergence of the summation process note that:

which implies $\phi(1)=1.0$. One can then produce a series for $\phi(x) - \phi(1)$ which converges faster than the original series. This series not only converges much faster, it also reduces roundoff loss.

This process of finding a faster converging series may be repeated again on the second series to produce a third sequence, which converges even more rapidly than the second.

The following equation is helpful in determining how may items are required in summing the series above.

思路

先求1,2,…,300的值,整数的值公式比较直观,可以直接求得

按照提示上的方法,推导出递推公式,即用另外几个数的值来表示当前位置的值,比较复杂,也比较有趣

对于在[i, i + 1]区间内的小数,用递推公式运用后几个整数的值求得,我用的是i+1, i+2, i+3, i+4四个数

注意

  1. 边界条件,如果用当前数的后四个数,到了297的时候,就不能继续向后走了,我选择的是297,298,299,300四个数来计算这个区间的数
  2. 注意C语言中乘法的int型和double型,尽管很注意,但是自己还是犯了错误

点评

应该是最难也是最有意思的一道题了,这样的题让人做的很有感觉!

推导公式还是挺痛苦的,思路理不清,大概用了三个时间段,总共五六个小时吧,所以一开始做的时候不要怀疑自己而去网上找答案,自己推,推出来之后还是很有成就感的!

Q2. Root of a Polynomial

题目

6-2 Root of a Polynomial (40 分)

A polynomial of degree n has the common form as p(x)=c, $p(x) = cnx^n + c{n - 1}x^{n - 1} + \dots + c_1x + c_0$ . Your task is to write a function to find a root of a given polynomial in a given interval.

Format of function:

1
double Polynomial_Root(int n, double c[], double a, double b, double EPS);

where int n is the degree of the polynomial; double c[] is an array of n+1 coefficients $cn, c{n - 1}, …, c_1$ and $c_0$ of the given polynomial; double a and b are the two end-points of the given interval; and double EPS is the accuracy of the root.

The function must return the root.

Note: It is guaranteed that a unique real number r exists in the given interval such that $p(r)=0$.

Sample program of judge:

1
2
3
4
5
6
7
8
9
10
11
12
13
14
15
16
17
18
19
20
21
22
23
24
25
#include <stdio.h>
#include <math.h>
#define ZERO 1e-13 /* X is considered to be 0 if |X|<ZERO */
#define MAXN 11 /* Max Polynomial Degree + 1 */
double Polynomial_Root(int n, double c[], double a, double b, double EPS);
int main()
{
int n;
double c[MAXN], a, b;
double EPS = 0.00005;
int i;
scanf("%d", &n);
for (i=n; i>=0; i--)
scanf("%lf", &c[i]);
scanf("%lf %lf", &a, &b);
printf("%.4f\n", Polynomial_Root(n, c, a, b, EPS));
return 0;
}
/* Your function will be put here */

Sample Input:

1
2
2 1 1.5 -1
0 2

Sample Output:

1
0.5000

思路

算法用Modified-Newton是可以的

需要求1阶和2阶导数,不过多项式求导很简单

初始点自己定,为了保证收敛,可以将给定的区间分成N等份,逐个试验是不是满足条件,我分的是100份

注意

这道题需要注意的地方还挺多的

  1. 考虑分母为0的情况,如果分母为0,就可以认为不符合,直接取下一个初值重新来
  2. 考虑-0的情况,这应该是OJ的问题了,不过,自己稍微加一下没啥
  3. 初始点的选择,不能随便取一个或者几个,可以取几十个几百个,我取100个迭代也没有超时

点评

坑的地方挺多的,自己也花了挺多的时间

还有,modified-newton method,真的很不明显,一开始在PPT和课本上都没有找到,复习的时候再课本的某段文字里发现了,不过可能modified-newton本来就不是一个专有名词吧

Q3. There is No Free Lunch

题目

6-3 There is No Free Lunch (40 分)

One day, CYLL found an interesting piece of commercial from newspaper: the Cyber-restaurant was offering a kind of “Lunch Special” which was said that one could “buy one get two for free”. That is, if you buy one of the dishes on their menu, denoted by $di$ with price $p_i$, you may get the two neighboring dishes $d{i - 1}$ and $d{i+1}$ for free! If you pick up $d_1$, then you may get $d_2$ and the last one $d_n$ for free, and if you choose the last one $d_n$, you may get $d{n - 1}$ and $d_1$ for free.

However, after investigation CYLL realized that there was no free lunch at all. The price $p_i$ of the i-th dish was actually calculated by adding up twice the cost $c_i$ of the dish and half of the costs of the two “free” dishes. Now given all the prices on the menu, you are asked to help CYLL find the cost of each of the dishes.

Format of function:

1
void Price( int n, double p[] );

where int n satisfies that 2< n ≤10000; double p[] is passed into the function as an array of prices $p_i$ and then will be returned storing the costs of the dishes.

Sample program of judge:

1
2
3
4
5
6
7
8
9
10
11
12
13
14
15
16
17
18
19
20
21
22
23
#include <stdio.h>
#define Max_size 10000 /* max number of dishes */
void Price( int n, double p[] );
int main()
{
int n, i;
double p[Max_size];
scanf("%d", &n);
for (i=0; i<n; i++)
scanf("%lf", &p[i]);
Price(n, p);
for (i=0; i<n; i++)
printf("%.2f ", p[i]);
printf("\n");
return 0;
}
/* Your function will be put here */

Sample Input:

1
12 23.64 17.39 12.77 16.62 10.67 14.85 12.68 26.90 28.30 15.59 37.99 23.18

Sample Output:

1
9.20 5.58 3.24 7.00 1.99 6.36 2.25 10.01 11.52 0.50 17.65 4.88

思路

由题意不难得出一个方程组,其系数矩阵很有特征

自己知道有两种思路:

一种是对最后一行和第一行做处理,其它的都是一个完美的三对角矩阵,这样就可以比较轻松的解出来

另一种是直接用Jacobi迭代或者Gauss-Siedel迭代解方程

题目的本意我想肯定是前者,但是我用的后者,因为简单粗暴

注意

一个特别需要注意的地方,如果用迭代法做,自己想开一个二维数组存系数矩阵,并不可以,这道题的Max_size给的很大,会直接段错误,我估计case里边也有很大的系数矩阵,就算动态分配估计也不可以吧..
不过由于这个矩阵比较特殊,主对角线上的值就是最大的,而且每行的和相同,所以可以轻松的推出Jacobi迭代中自己需要的信息,而且写起来更简单

点评

好吧,用了简单粗暴的方式解决了本来还需要推导一番的问题,如果先做了第四题,那么这道题应该很容易了hh

Q4. Compare Methods of Jacobi with Gauss-Seidel

题目

6-4 Compare Methods of Jacobi with Gauss-Seidel (30 分)

Use Jacobi and Gauss-Seidel methods to solve a given $n\times n$ linear system $A\vec{x} = \vec{b}$ with an initial approximation $\vec{x^0}$
Note: When checking each $a{ii}$, first scan downward for the entry with maximum absolute value ($a{ii}$ included). If that entry is non-zero, swap it to the diagonal. Otherwise if that entry is zero, scan upward for the entry with maximum absolute value. If that entry is non-zero, then add that row to the i-th row.

Format of functions:

1
2
3
int Jacobi( int n, double a[][MAX_SIZE], double b[], double x[], double TOL, int MAXN );
int Gauss_Seidel( int n, double a[][MAX_SIZE], double b[], double x[], double TOL, int MAXN );

where int n is the size of the matrix of which the entries are in the array double a[][MAX_SIZE] and MAX_SIZE is a constant defined by the judge; double b[] is for $\vec{b}$, double x[] passes in the initial approximation $\vec{x^0}$ and return the solution $\vec{x}$; double TOL is the tolerance for $\lVert \vec{x^{k+1}} - \vec{x^k} \rVert$; and finally int MAXN is the maximum number of iterations.

The function must return:

  • k if there is a solution found after k iterations;
  • 0 if maximum number of iterations exceeded;
  • 1 if the matrix has a zero column and hence no unique solution exists;
  • 2 if there is no convergence, that is, there is an entry of $\vec{x^K}$that is out of the range [-bound, bound] where bound is a constant defined by the judge.

Sample program of judge:

1
2
3
4
5
6
7
8
9
10
11
12
13
14
15
16
17
18
19
20
21
22
23
24
25
26
27
28
29
30
31
32
33
34
35
36
37
38
39
40
41
42
43
44
45
46
47
48
49
50
51
52
53
54
55
56
57
58
59
60
61
62
63
64
65
66
67
68
69
70
71
72
73
#include <stdio.h>
#include <math.h>
#define MAX_SIZE 10
#define bound pow(2, 127)
#define ZERO 1e-9 /* X is considered to be 0 if |X|<ZERO */
enum bool { false = 0, true = 1 };
#define bool enum bool
int Jacobi( int n, double a[][MAX_SIZE], double b[], double x[], double TOL, int MAXN );
int Gauss_Seidel( int n, double a[][MAX_SIZE], double b[], double x[], double TOL, int MAXN );
int main()
{
int n, MAXN, i, j, k;
double a[MAX_SIZE][MAX_SIZE], b[MAX_SIZE], x[MAX_SIZE];
double TOL;
scanf("%d", &n);
for (i=0; i<n; i++) {
for (j=0; j<n; j++)
scanf("%lf", &a[i][j]);
scanf("%lf", &b[i]);
}
scanf("%lf %d", &TOL, &MAXN);
printf("Result of Jacobi method:\n");
for ( i=0; i<n; i++ )
x[i] = 0.0;
k = Jacobi( n, a, b, x, TOL, MAXN );
switch ( k ) {
case -2:
printf("No convergence.\n");
break;
case -1:
printf("Matrix has a zero column. No unique solution exists.\n");
break;
case 0:
printf("Maximum number of iterations exceeded.\n");
break;
default:
printf("no_iteration = %d\n", k);
for ( j=0; j<n; j++ )
printf("%.8f\n", x[j]);
break;
}
printf("Result of Gauss-Seidel method:\n");
for ( i=0; i<n; i++ )
x[i] = 0.0;
k = Gauss_Seidel( n, a, b, x, TOL, MAXN );
switch ( k ) {
case -2:
printf("No convergence.\n");
break;
case -1:
printf("Matrix has a zero column. No unique solution exists.\n");
break;
case 0:
printf("Maximum number of iterations exceeded.\n");
break;
default:
printf("no_iteration = %d\n", k);
for ( j=0; j<n; j++ )
printf("%.8f\n", x[j]);
break;
}
return 0;
}
/* Your function will be put here */

Sample Input 1:

1
2
3
4
5
3
2 -1 1 -1
2 2 2 4
-1 -1 2 -5
0.000000001 1000

Sample Output 1:

1
2
3
4
5
6
7
Result of Jacobi method:
No convergence.
Result of Gauss-Seidel method:
no_iteration = 37
1.00000000
2.00000000
-1.00000000

Sample Input 2:

1
2
3
4
5
3
1 2 -2 7
1 1 1 2
2 2 1 5
0.000000001 1000

Sample Output 2:

1
2
3
4
5
6
7
Result of Jacobi method:
no_iteration = 232
1.00000000
2.00000000
-1.00000000
Result of Gauss-Seidel method:
No convergence.

Sample Input 3:

1
2
3
4
5
6
7
5
2 1 0 0 0 1
1 2 1 0 0 1
0 1 2 1 0 1
0 0 1 2 1 1
0 0 0 1 2 1
0.000000001 100

Sample Output 3:

1
2
3
4
5
6
7
8
9
Result of Jacobi method:
Maximum number of iterations exceeded.
Result of Gauss-Seidel method:
no_iteration = 65
0.50000000
0.00000000
0.50000000
0.00000000
0.50000000

思路

思路很清晰,两个算法也都给出了,就是把它实现一遍

课本上原模原样的算法抄上去就可以了

注意需要在之前按照题意对矩阵进行调整

注意

由于自己一遍过了,所以觉得没啥需要注意的,调整矩阵,题目中也提示到了

点评

第一道做出的题目,抄算法,所以觉得这道题没啥..

Q5. Approximating Eigenvalues

题目

6-5 Approximating Eigenvalues (40 分)

Approximate an eigenvalue and an associated eigenvector of $a$ given $n \times n$ matrix $A$ near $a$ given value $p$ and a nonzero vector $
\vec{x} = (x_1, \dots, x_n)^T$

Format of function:

1
int EigenV(int n, double a[][MAX_SIZE], double *lambda, double v[], double TOL, int MAXN);

where int is the size of the matrix of which the entries are in the array double a[][MAX_SIZE] and MAX_SIZE is a constant defined by the judge; double *lambda is passed into the function as an initial approximation $p$ of the eigenvalue and is supposed to be returned as a more accurate eigenvalue; double v[] is passed into the function as the initial vector $\vec{x}$ and is supposed to be returned as the associated eigenvector with unit $\lVert \cdot \rVert$ norm; double TOL is the tolerance for the eigenvalue; and finally int MAXN is the maximum number of iterations.

The function must return:

  • 1 if there is a solution;
  • 0 if maximum number of iterations exceeded;
  • −1 if p is just the accurate eigenvalue.

Sample program of judge:

1
2
3
4
5
6
7
8
9
10
11
12
13
14
15
16
17
18
19
20
21
22
23
24
25
26
27
28
29
30
31
32
33
34
35
36
37
38
39
40
41
42
#include <stdio.h>
#define MAX_SIZE 10
int EigenV(int n, double a[][MAX_SIZE], double *lambda, double v[], double TOL, int MAXN);
int main()
{
int n, MAXN, m, i, j, k;
double a[MAX_SIZE][MAX_SIZE], v[MAX_SIZE];
double lambda, TOL;
scanf("%d", &n);
for (i=0; i<n; i++)
for (j=0; j<n; j++)
scanf("%lf", &a[i][j]);
scanf("%lf %d", &TOL, &MAXN);
scanf("%d", &m);
for (i=0; i<m; i++) {
scanf("%lf", &lambda);
for (j=0; j<n; j++)
scanf("%lf", &v[j]);
switch (EigenV(n, a, &lambda, v, TOL, MAXN)) {
case -1:
printf("%12.8f is an eigenvalue.\n", lambda );
break;
case 0:
printf("Maximum number of iterations exceeded.\n");
break;
case 1:
printf("%12.8f\n", lambda );
for (k=0; k<n; k++)
printf("%12.8f ", v[k]);
printf("\n");
break;
}
}
return 0;
}
/* Your function will be put here */

Sample Input 1:

1
2
3
4
5
6
7
3
1 2 3
2 3 4
3 4 5
0.0000000001 1000
1
-0.6 1 1 1

Sample Output 1:

1
2
-0.62347538
1.00000000 0.17206558 -0.65586885

Sample Input 2:

1
2
3
4
5
6
7
2
0 1
1 0
0.0000000001 10
2
1.0 1 1
100.0 1 0

Sample Output 2:

1
2
1.00000000 is an eigenvalue.
Maximum number of iterations exceeded.

思路

近似特征值的算法用反幂法是可以的

我按照书上的算法走的

书上的算法Step1是给p赋值,本题目中给定了初值,直接用它就可以

需要解线性方程组,直接解似乎会超时,需要做一个LU Factorization然后之后的每次计算用L和U矩阵而不是原始的A矩阵,如果LU factorization做不下去,那就是题目中说的给定值就是初始值了

注意

有两个需要注意的地方

  1. 不要改掉原来的系数矩阵,因为每次迭代解方程的系数矩阵需要在原矩阵对角线上减去lambda,要在原来的矩阵上减,而不是一直减下去
  2. 课本上的算法有坑!至少英文版第七版上是不对的,Step8:$\mu = y_p$,而新的$p$是在Step9算的,所以Step8应该在Step9之后!

点评

虽然这两个坑好像很多人踩,但我都没有踩到,也算是比较幸运的吧

代码量还是挺大的,比较烦,需要LU分解和解方程,不过都有算法,自己想想也不复杂

Q6. Cubic Spline

题目

6-6 Cubic Spline (40 分)

Construct the cubic spline interpolant $S$ for the function $f$, defined at points $x_0 < x_1 < \dots < x_n$, satisfying some given boundary conditions. Partition a given interval into $m$ equal-length subintervals, and approximate the function values at the endpoints of these subintervals.

Format of functions:

1
2
3
void Cubic_Spline(int n, double x[], double f[], int Type, double s0, double sn, double a[], double b[], double c[], double d[]);
double S( double t, double Fmax, int n, double x[], double a[], double b[], double c[], double d[] );

The function Cubic_Spline is for calculating the set of coefficients of
$S(x)$ where $S(x) = S^{[j]}(x) = aj + b_j(x - x{j - 1}) + cj(x - x{j - 1})^2 + dj(x - x{j - 2})^3$. The function S is for obtaining an approximation of $f(t)$ using the spline function $S(t)$. The parameters are defined as the following:

int n is the number of interpolating points−1;
double x[] contains n+1 distinct real numbers $x_0 < x_1 < \dots < x_n$;
double f[] contains n+1 real numbers $f(x_0), f(x_1), \dots ,f(x_n)$;
int Type is the type of boundary conditions, where 1 corresponds to the clamped boundary condition $S’(x_0) = s_0, S’(x_n) = s_n$ and 2 corresponds to the natural boundary condition $S’’(x_0) = s_0, S’’(x_n) = s_n$;
double s0 and double sn are $s_0$ and $s_n$ respectively;
double a[], b[], c[], and d[] contain the set of coefficients of $S(x)$;
double t is an endpoint of a subinterval;

and finally double Fmax is the default value that $S(t)$ will assume if t is out of the range $[x_0, x_n]$

Sample program of judge:

1
2
3
4
5
6
7
8
9
10
11
12
13
14
15
16
17
18
19
20
21
22
23
24
25
26
27
28
29
30
31
32
33
34
35
36
#include <stdio.h>
#define MAX_N 10
void Cubic_Spline(int n, double x[], double f[], int Type, double s0, double sn, double a[], double b[], double c[], double d[]);
double S( double t, double Fmax, int n, double x[], double a[], double b[], double c[], double d[] );
int main()
{
int n, Type, m, i;
double x[MAX_N], f[MAX_N], a[MAX_N], b[MAX_N], c[MAX_N], d[MAX_N];
double s0, sn, Fmax, t0, tm, h, t;
scanf("%d", &n);
for (i=0; i<=n; i++)
scanf("%lf", &x[i]);
for (i=0; i<=n; i++)
scanf("%lf", &f[i]);
scanf("%d %lf %lf %lf", &Type, &s0, &sn, &Fmax);
Cubic_Spline(n, x, f, Type, s0, sn, a, b, c, d);
for (i=1; i<=n; i++)
printf("%12.8e %12.8e %12.8e %12.8e \n", a[i], b[i], c[i], d[i]);
scanf("%lf %lf %d", &t0, &tm, &m);
h = (tm-t0)/(double)m;
for (i=0; i<=m; i++) {
t = t0+h*(double)i;
printf("f(%12.8e) = %12.8e\n", t, S(t, Fmax, n, x, a, b, c, d));
}
return 0;
}
/* Your functions will be put here */

Sample Input:

1
2
3
4
5
2
0.0 1.0 2.0
0.0 1.0 2.0
1 1.0 1.0 0.0
0.0 3.0 2

Sample Output:

1
2
3
4
5
0.00000000e+00 1.00000000e+00 0.00000000e+00 0.00000000e+00
1.00000000e+00 1.00000000e+00 0.00000000e+00 0.00000000e+00
f(0.00000000e+00) = 0.00000000e+00
f(1.50000000e+00) = 1.50000000e+00
f(3.00000000e+00) = 0.00000000e+00

思路

算法名称已经告诉了,书上也有现成的算法

有一个区别在于,本题目的Natural Cubic Spline并不是两端的二阶导为0,而是等于s0和sn. 这个需要对原算法做出一定的调整,其实就是推导出来的系数矩阵中的系数和右侧的首尾的值改一下就可以了..

注意

很坑的一点,很容易忽视的一点!!

如果发现自己总是2、3点过不了,有时候不一定是Spline算法的问题,而是自己写的S函数有问题!!我当时2、3点过不了,就是S函数的问题,注意区间、边界值之类的,反正多试几次应该就有了~

点评

唉,最后两个点,死活过不了,提交次数最多的一道题了!!

没想到啊没想到,竟然是S的问题而不是算法的问题,气死我了!!

Q7. Orthogonal Polynomials Approximation

题目

6-7 Orthogonal Polynomials Approximation (40 分)

Given a function $f$ and a set of $m>0$ distinct points $x1 < x_2 < \dots < x_m$. You are supposed to write a function to approximate $f$ by an orthogonal polynomial using the exact function values at the given m points with a weight $w(x_i)$ assigned to each point $x_i$. The total error $err =
sum
{i=1}^{m}w(x_i)|f(x_i) - P_n(x_i)|^2$ must be no larger than a given tolerance.

Format of function:

1
int OPA( double (*f)(double t), int m, double x[], double w[], double c[], double *eps );

where the function pointer double (*f)(double t) defines the function $f$; int m is the number of points; double x[] contains points $x_1 < x_2 < \dots < x_m$; double w[] contains the values of a weight function at the given points x[]; double c[] contains the coefficients $c_1 < c_2 < \dots < c_m$ of the approximation polynomial $P_n(x) = c_0 + c_1x + \dots + c_nx^n$; double *eps is passed into the function as the tolerance for the error, and is supposed to be returned as the value of error. The function OPA is supposed to return the degree of the approximation polynomial.

Note: a constant Max_n is defined so that if the total error is still not small enough when n = Max_n, simply output the result obtained when n = Max_n.

Sample program of judge:

1
2
3
4
5
6
7
8
9
10
11
12
13
14
15
16
17
18
19
20
21
22
23
24
25
26
27
28
29
30
31
32
33
34
35
36
37
38
39
40
41
42
43
44
45
46
47
48
49
50
51
52
53
54
55
56
57
#include <stdio.h>
#include <math.h>
#define MAX_m 200
#define MAX_n 5
double f1(double x)
{
return sin(x);
}
double f2(double x)
{
return exp(x);
}
int OPA( double (*f)(double t), int m, double x[], double w[], double c[], double *eps );
void print_results( int n, double c[], double eps)
{
int i;
printf("%d\n", n);
for (i=0; i<=n; i++)
printf("%12.4e ", c[i]);
printf("\n");
printf("error = %9.2e\n", eps);
printf("\n");
}
int main()
{
int m, i, n;
double x[MAX_m], w[MAX_m], c[MAX_n+1], eps;
m = 90;
for (i=0; i<m; i++) {
x[i] = 3.1415926535897932 * (double)(i+1) / 180.0;
w[i] = 1.0;
}
eps = 0.001;
n = OPA(f1, m, x, w, c, &eps);
print_results(n, c, eps);
m = 200;
for (i=0; i<m; i++) {
x[i] = 0.01*(double)i;
w[i] = 1.0;
}
eps = 0.001;
n = OPA(f2, m, x, w, c, &eps);
print_results(n, c, eps);
return 0;
}
/* Your function will be put here */

Sample Output:

1
2
3
4
5
6
7
3
-2.5301e-03 1.0287e+00 -7.2279e-02 -1.1287e-01
error = 6.33e-05
4
1.0025e+00 9.6180e-01 6.2900e-01 7.0907e-03 1.1792e-01
error = 1.62e-04

思路

算法的话,按照PPT上的算法即可,不需要做太大的改动,注意需要求内积,自己写个内积函数

注意

很需要注意的一点,就是题目要求的是标准系数,而不是算法求出来每个项的系数,这是很需要注意的!!

当你算出来error是一样的,但是系数全部不一样的时候,绝大多数都是这个错误!

点评

课本上没有这个算法,自己搞懂原理之后,写出来一个,样例是可以过的,但是总是有些点过不了,改用PPT的算法就过了,差不多都是一样的,除了error的计算,它是一步步减的,我是最后算的,可是本质上是一样的,唉,不知道为什么,不过AC了,就不去想它了。

Q8. Shape Roof

题目

6-8 Shape Roof (40 分)

The kind of roof shown in Figure 1 is shaped from plain flat rectangular plastic board in Figure 2.


Figure 1


Figure 2

The transection of the roof is a sine curve which fits the function $y(x)=lsin(lx)$ in centimeters. Given the length of the roof, your task is to calculate the length of the flat board needed to shape the roof.

Format of function:

1
double Integral(double a, double b, double (*f)(double x, double y, double z), double eps, double l, double t);

where the function Integral returns the value of a definit integral of a given function pointed by f over a given interval from double a to double b. The integrant function f will be defined in the sample program of judge. Other parameters are: double eps, the accuracy of the resulting value of the integral; double l and double t, the altitude and the frequency of the sine curve, respectively.

Note: the length of the flat board which Integral returns must be in meters.

Sample program of judge:

1
2
3
4
5
6
7
8
9
10
11
12
13
14
15
16
17
18
19
20
21
22
#include <stdio.h>
#include <math.h>
double f0( double x, double l, double t )
{
return sqrt(1.0+l*l*t*t*cos(t*x)*cos(t*x));
}
double Integral(double a, double b, double (*f)(double x, double y, double z),
double eps, double l, double t);
int main()
{
double a=0.0, b, eps=0.005, l, t;
scanf("%lf %lf %lf", &l, &b, &t);
printf("%.2f\n", Integral(a, b, f0, eps, l, t));
return 0;
}
/* Your function will be put here */

Sample Input:

1
2 100 1

Sample Output:

1
1.68

思路

就是一个积分,甚至积分公式的函数都给出来了,直接代入值就可以了

分成足够多的小段,矩形累加起来是可以过的

注意

没啥注意的,试几次总会过得

点评

笑死我了,题目本意肯定不是这样,不过,反正,四行代码,过了,就那样了,可能是今年的case要求不是很高吧,分了4000000段,都没有超时~


总结

八道题,除了第一道觉得很有意思之外,其它的基本上都有现成的算法,所以做过之后觉得还好..

感觉这种小数点后十几位的要求,有一定的玄学因素在里边,可能同样的算法,步骤顺序不同,结果就有差异..

不过这八道题做起来还是很有价值的,不是像PAT、LeetCode那样的一个算法知识点,需要的是对数学算法的实现,还是比较有趣的~

Koa源码学习(3)

Posted on 2019-01-10 | In Web |

看完了大体的内容,对一些细枝末节再看一下,最后看一下test和benchmark的代码,并作出一个总结。


一些细节

error handling

Koa的error处理的函数有两个,一个是在application.js中的app.onerror,一个是context.js中的ctx.onerror.

前者,是一个默认的错误处理函数,如果用户设置了自己的错误处理:

1
app.on('error', (err) => {...})

那就不会用到这个。
(其实这个的功能就是简单的输出一下原始的错误信息)

前者是给服务端看的,用来log错误信息。

后者,是在发生错误后如何反映给客户端的,在上一篇中写过了。

test

Koa用的是Jest,似乎看起来很不错的样子。

1
2
3
4
5
6
7
8
9
10
11
"jest": {
"testMatch": [
"**/test/!(helpers)/*.js"
],
"coverageReporters": [
"text-summary",
"lcov"
],
"bail": true,
"testEnvironment": "node"
}

配置就这些,其实,Jest号称0配置,没有这些配置也可以自己找到。

这几项配置,在Jest的文档中:https://jestjs.io/docs/en/configuration 都可以找到,比较直观。

assert用的是Node自带的测试模块,当assert失败的时候会throwAssertionError

虽然自己从来没有写过测试,但是看测试的代码还是挺清楚的,毕竟,测试就要是写的简单直观。

之后自己的开发过程中也可以学着Test-Driven的模式,Jest的使用也特别的友好,API很清楚了,把关注点都放在测试本身上而不是这个库上。

coverage

以前一直不知道coverage是啥意思,看了这个测试以及coverage之后,算是大致明白了。

coverage说的就是写的测试对源码的覆盖程度,是不是每行都运行过了,是不是每个branch都涉及到了,是不是每个函数都执行了之类的,算是评价测试的一个指标吧。

最终会生成coverage报告,说明哪些执行了多少次,也是长见识了:

-w726

benchmarks

这里用的简单的bash脚本跑的测试,用wrk去发请求来测试..

主要是对中间件的数量测试性能,测试加载了许多中间件或者异步中间件之后,性能表现怎么样。

代码其实比较简单。

总结

关于Koa

看完Koa,好吧,其实是有一些失落的,还没有当初看lodash的时候那种感觉。

因为,Koa真的是一个极简的框架啊!!什么多余的功能都没有,核心的代码就几十行。就是把中间件compose起来,作为中间件夹在请求与响应之间。

大致流程就是:

http reqeust ->(封装,处理)-> ctx -> (穿过中间件,自己的逻辑也在其中) -> http response

其实,一个后端框架,本质上就是这些了,处理HTTP请求响应,至于什么路由啊、什么authentication啊、MVC啊,都是人为设定的Design Pattern.

看过代码最大的收获就是认识了后端框架的核心,并不是那么神秘,希望自己通过学习对后端有更多的认识吧~

关于Project

除了源码的学习,自己对开发的一些规范以及工具有一定的了解吧,也算是一个收获。

了解了代码test, coverage, benchmark,基本都算是第一次接触,相信之后自己写代码的时候,也会逐渐写一些测试。

了解了JSDoc标注,debug, eslint等一些helper library,总的来说,还是学到了很多,虽然很多都是皮毛。

Koa源码学习(2)

Posted on 2019-01-03 | Edited on 2019-01-10 | In Web |

context.js

这一部分,定义了Koa的Context对象,其实,这一部分,粗略的看过去,就是把Koa的request和response两个对象合到一个context里边,同时加了一些错误处理的便捷方式。

delegation

1
2
3
4
5
6
7
8
9
delegate(proto, 'response')
.method('attachment')
.method('redirect')
...
delegate(proto, 'request')
.method('acceptsLanguages')
.method('acceptsEncodings')
...

最后这一部分代码,就是让ctx可以方便的使用response和request里的东西,做了一个delegate,本来需要:ctx.response.attachment(),这样只需要:ctx.attachment().

异常/错误处理

1
2
3
4
5
assert: httpAssert, // >>: wrap http-assert into context
throw(...args) { // >>: wrap throw function
throw createError(...args);
},

用的分别是http-assert和http-errors来进行assert和error处理

this.onerror(error){...}的处理:

```js
// delegate
this.app.emit(‘error’, err, this); // >>: here pass the context

1
2
3
4
5
6
7
8
9
10
11
12
13
14
15
16
17
18
在这里发生的错误,也告知给application,这样可以让application做出相应的处理。
这里同时还把`this`传了过去,这样app可以得到context.
```js
let headerSent = false; // >>: already sent
if (this.headerSent || !this.writable) {
headerSent = err.headerSent = true;
}
...
// nothing we can do here other
// than delegate to the app-level
// handler and log.
if (headerSent) {
return;
}

这里判断是不是需要对客户端做出response,如果已经sent了,那么就不用做啥了,否则需要处理response返回给客户端。

后边的代码无非是对不同情况的判断,做出合适的response。

Cookies处理

1
const COOKIES = Symbol('context#cookies');

生成一个唯一的symbol

get和set分别是这样的操作:

1
2
3
4
5
6
7
8
9
10
11
12
13
get cookies() {
if (!this[COOKIES]) {
this[COOKIES] = new Cookies(this.req, this.res, {
keys: this.app.keys,
secure: this.request.secure
});
}
return this[COOKIES];
},
set cookies(_cookies) {
this[COOKIES] = _cookies;
}

判断如果cookie不存在的话,生成之。

OK,以上就是context的全部内容,主要的工作,还是把request和response合成一个。

request.js

700+ line的文件,其实,比较容易看懂,绝大部分的内容,都是对node原有的req的封装和简易处理。

inspect(), toJSON()和之前的没有太大的区别。

大量的内容,都是对原来的req的封装,好奇这里为什么不用delegate直接写完,非要写这么多的代码。

原模原样access的有:

  • header/headers: 请求头
  • url
  • method: 请求方法,比如GET
  • socket

添加处理的:

  • origin: protocol://host
  • href: href
  • host: 获取host
  • hostname: 获取hostname
  • URL: 返回URL对象,lazy生成
  • fresh: last-modified/etag 是否匹配
  • stale: !fresh,已经修改了,需要重新获取
  • idempotent: 看请求方法是不是安全的
  • charset: content-type里的charset
  • length: content-length
  • protocol: 使用的协议,http/https等
  • ips: 当proxy存在的时候,得到ip list
  • ip: remote address
  • subdomains: 获取subdomain数组
  • secure: 判断是不是https
  • path: path
  • query: 路径里的query信息
  • querystring
  • search: querystring带前边的问号

其它一些method/property:

accept, acceptsEncodings, acceptsCharsets, acceptsLanguages:

判断请求是否accept对应的类型,用的accepts

is:

判断请求的content-type是不是自己想要的,用的type-is

type:

返回MIME类型

get:

get对应的header内容,这里还处理了referer的拼写错误,自己也是第一次注意到。

总结来看,request部分做的,就是对于node的req的封装,同时添加了一些helper方法,比如accept,is等。

response.js

不出意外的话,Response也是对Node的res的封装,看一看有什么值得看的地方。

access原来Node的res

  • socket
  • status
  • statusMessage
  • statusMessage=
  • headers
  • length=: content-length
  • headerSent
  • etag=
  • flushHeaders

添加处理的

  • status=: 加入了一些验证,以及对body的处理(如果对应的status body为空,需要设置)
  • length: content-length,如果没有的话,自己需要得到body的长度
  • type=: 设置content-type,有一定判断
  • lastModified: 有一个时间的转换
  • lastModified=
  • etag: 考虑了ETag的两种格式
  • type: content-type,去除了后边诸如charset之类的东西
  • header处理:
    • get: 获取header
    • set: setHeader的封装,支持多种方式
    • append: append header
    • remove: remove header
  • writable: 是否可写,socket.writable,如果已经完成不可写

自己的property/method

body:

操作http的body,需要进行不同情况的处理

  • 内容为null: 204
  • 如果没有设定过status,设为200
  • 没有设置content-type,需要进行设定
  • 对于不同类型的数据:
    • string: 设定length, type
    • buffer: type设为bin
    • stream:
    • json: 设定type,remove content-type

vary:

设置Varyheader

redirect:

重定向!
-如果参数是back: 回到上一页面
-设置status为302
-说明这在redirect

attachment:

当有附加文件的时候,设置Content-Disposition header,同时设置Content-Type,用到了content-disposition包

is:

判断type是否满足,类似request的

总体来看,response和request非常相似,封装res,方便处理Node Response的header和body等

Koa源码学习(1)

Posted on 2018-12-27 | In Web |

感觉代码不多,就生看代码了,从application.js开始。

debug

1
const debug = require('debug')('koa:application'); // >>: debug usage, brilliant

这个库的使用,看起来还是很不错的,可以控制输出哪些debug信息,以后项目中可以用下

customize打印application对象

1
2
3
if (util.inspect.custom) { // >>: inspect
this[util.inspect.custom] = this.inspect;
}
1
2
3
4
5
6
7
8
9
10
11
12
13
14
15
16
17
18
19
20
21
22
23
24
25
26
/**
* Return JSON representation.
* We only bother showing settings.
*
* @return {Object}
* @api public
*/
toJSON() {
return only(this, [
'subdomainOffset',
'proxy',
'env'
]);
}
/**
* Inspect implementation.
*
* @return {Object}
* @api public
*/
inspect() {
return this.toJSON();
}

因为还有context,request,response等对象,可能并没有toString的方法,就不输出它们,这里定制的方式值得学习一下:this[util.inspect.custom] = this.inspect

use()

就是简单的把中间件放到自己的middleware中:

1
this.middleware.push(fn);

callback()

koa的listen其实就是:

1
2
const server = http.createServer(this.callback());
return server.listen(...args);

自己的东西的注入,都是在callback()里完成的

node文档:

http.createServer([options][, requestListener])
The requestListener is a function which is automatically added to the 'request' event.

意思大概就是,每次有request时间,都会调用这个函数吧。

在里边封装了自己的处理方式:

1
2
3
4
5
6
const handleRequest = (req, res) => {
const ctx = this.createContext(req, res);
return this.handleRequest(ctx, fn);
};
return handleRequest;

compose()

嗯,其实就是把所有的中间件串起来,Promise的使用,自己还是需要学习啊

createContext(req, res)

对原来的request和response的一个封装

1
2
3
4
5
6
7
8
9
10
11
12
13
14
createContext(req, res) {
const context = Object.create(this.context);
const request = context.request = Object.create(this.request);
const response = context.response = Object.create(this.response);
context.app = request.app = response.app = this;
context.req = request.req = response.req = req;
context.res = request.res = response.res = res;
request.ctx = response.ctx = context;
request.response = response;
response.request = request;
context.originalUrl = request.originalUrl = req.url;
context.state = {};
return context;
}

其实还是很简单的,就主要是几个绑定,互相绑一绑,然后和node原来的req, res绑一绑

handleRequest(ctx, fn)

1
2
3
4
5
6
7
8
handleRequest(ctx, fnMiddleware) {
const res = ctx.res;
res.statusCode = 404;
const onerror = err => ctx.onerror(err);
const handleResponse = () => respond(ctx);
onFinished(res, onerror);
return fnMiddleware(ctx).then(handleResponse).catch(onerror);
}

其实有些看不太懂…

为什么,要用handleResponse而不直接用respond,为什么用ctx,而不用middleware处理之后的ctx

为什么要有onFinish(),感觉并不会有什么用

respond

这个helper function,里边就是各种对不同情况的处理,这个看具体response的源码的时候再说吧


嗯,感觉看完application.js,也就那么回事,就是处理中间件,而已,可能这就是Koa有趣的地方吧,精简的核心,统一的接口,无限可能的拓展。

Koa源码学习(0)

Posted on 2018-12-26 | In Web |

一直想看点库的源码,后来发现,Koa好像只有几千行,那就拿它开刀啦~

现场clone,版本应该是2.6.2,2018-10-6的


文件结构

也算是学习一下一个开源项目如何组织吧…

1
2
3
4
5
6
7
8
9
10
11
12
13
14
15
16
17
18
.
├── .editorconfig
├── .eslintrc.yml
├── .git
├── .gitignore
├── .mailmap
├── .npmrc
├── .travis.yml
├── AUTHORS
├── CODE_OF_CONDUCT.md
├── History.md
├── LICENSE
├── Readme.md
├── /benchmarks
├── /docs
├── /lib
├── package.json
└── /test
  • Readme.md: 不解释,字面意思
  • LICENSE: 开源项目的license,目前自己不太懂,有空了解一下,先不管,跟代码无关
  • History.md: 记录项目时间线,嗯,很有必要,似乎部分还是自动生成的,像GitHub的issue,PR等等还是需要进一步的学习
  • CODE_OF_CONDUCT.md: 有趣,行为守则声明,原来开源项目还有这个
  • AUTHORS: 不解释
  • .git, .gitignore: 不解释
  • .mailmap: 可能是一个author-mail的对应吧,不过里边只有一个名字,很奇怪
  • .editorconfig: 一个更改Editor/IDE编辑器的设置工具,读取文件,然后改变IDE/Editor的设置,高级啊!!!https://editorconfig.org/
  • .eslintrc.yml: eslint的配置,eslint自己也需要进一步的学习
  • .npmrc: npm的配置,加一句package-lock=false就可以不生成package-lock.json,学习到了
  • .travis.yml: TravisCI相关的东西,等看它测试的时候再说吧
  • package.json: npm的dependency、scripts等配置,入口!第一个与代码相关的文件
  • lib: 源码
  • test: 测试代码,测试需要好好学习一下
  • docs: 文档
  • benchmarks: 性能测试

package.json

读所有node项目源码的第一步…

npm官方文档关于package.json的:https://docs.npmjs.com/files/package.json

  • name, version: 必须,用于identify一个npm包
  • description, keywords: optional 用于npm serach的时候
  • license: 暂不解释

main

The main field is a module ID that is the primary entry point to your program. That is, if your package is named foo, and a user installs it, and then does require(“foo”), then your main module’s exports object will be returned.

之前一直觉得没啥用,原来这么关键,就是require的时候,返回的对象

files

The optional files field is an array of file patterns that describes the entries to be included when your package is installed as a dependency.

也很有用,当别人依赖这个包的时候,不是装所有的包,而是只装所包含的文件

所谓npm install,其实就是把文件下载下来放到node_modules里,没啥神奇的

repository

repo的位置,默认GitHub,加上后边的路径,所以就是koajs/koa了

engines

声明node版本吧

jest

jest的配置,感觉放在package.json里不如放在jest.config.js里,这个日后再看

dependencies

依赖,如果npm -i -s的话,会自动加进去

devDependencies

开发时候的依赖,如果这个项目运行的时候不需要的依赖,那就放在这里边

scripts

执行脚本,npm run xxx


OK,所有的term都看过了,接下来,npm install吧

跑一跑scripts里边的几个命令,注意bench的时候,没有安装wrk,先装一下

第一个Koa应用

官方的tutorial:

1
2
3
4
5
6
7
8
9
const Koa = require('../koa');
const app = new Koa();
// response
app.use(ctx => {
ctx.body = 'Hello Koa';
});
app.listen(3000);

Debug

现在有个问题是,如何调试,node应用,如何打断点,单步运行呢?

先看一看官方的guide吧:https://nodejs.org/en/docs/guides/debugging-getting-started/

官方指引的Debug NodeJS in Chrome: https://medium.com/@paul_irish/debugging-node-js-nightlies-with-chrome-devtools-7c4a1b95ae27

发现新大陆啊!!!

嗯嗯,vscode的配置也很简单,甚至帮你自动完成!

自此,准备工作结束,开始源码之旅~

12…11
Xiaodong Zhao

Xiaodong Zhao

Coder love Design

105 posts
19 categories
GitHub E-Mail
© 2019 Xiaodong Zhao
Powered by Hexo v3.3.8
|
Theme — NexT.Mist v6.3.0